

Wednesday, October 31, 2018
More Eskimo Kisses
Two more sweet cards are in my stash today... here again is Eskimo Kisses from Sugar Pea Designs, and some I Love Winter paper from Echo Park:
 Keeping it brief... Trick or Treaters arriving any minute now. Happy Halloween!
Tuesday, October 30, 2018
Six simple Thank-You's
My daughter asked me to make a group of thank you cards for her, and they needed to be both male & female friendly. I recently bought these Moda Scraps papers with wonderful tiny fall patterns on them, and thought they'd work well for the season & occasion. I also pulled out my Waterfront stamp set for the first time - I've been dying to use this!

 I added a little Maya Road twine, and a Verve sentiment, and attached them with pop dots:


Monday, October 29, 2018
Mix It Up Challenge #48
I am playing along with the Sugar Pea Designs October Mix It Up Challenge #48 today. I got this sweet "Eskimo Kisses" stamp set this summer, and already have a whole whack of images stamped and coloured! So you'll be seeing more than a few of these little penguins over the coming weeks. I went with the sketch side of the inspiration, and just tweeked the sentiment position a little, as I liked it better centered:


Patterned papers are I Love Winter by Echo Park; Stamp set is Eskimo Kisses by Sugar Pea Design; Stitched Alpine Snowflake dies are Poppy Stamps; Copic Markers.

Sunday, October 28, 2018
Mojo Monday returns!
I was very happy to read that Julee Tilman was resurrecting Mojo Monday on her blog this week. It's going to be a bi-weekly sketch challenge, which is perfect. She does amazing sketches! Having said that, I did a simplified version of this one... I'm in need of several masculine cards for November, so I put a couple of these together. I edited the sketch a little, as it was just getting too busy for me:


Patterned papers are Echo Park; Stamps are Hello Life, Close To My Heart; Star dies are Taylored Expressions, Inks are Sunset & Chocolate, CTMH.


Saturday, October 27, 2018
A 21st Birthday
My baby is 21 today, and she is one of my biggest card-making supporters! Always willing to look at my work and give me suggestions or opinions. When she was little, she was all about bright and happy colours, with a little sparkle thrown in. So even though she's no longer wearing pink and purple every day... it's still what I reach for when it comes to making her cards. And "Boo" is a nickname if you're wondering about the odd sentiment!
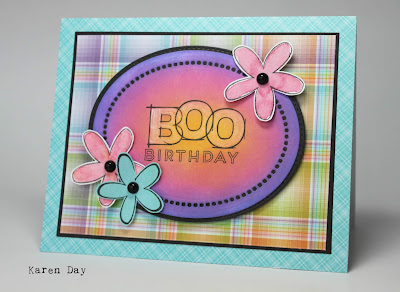 I had fun with some Distress Oxide ink blending, stamped the sentiment over top, and then coloured Boo and the flowers with some Wink of Stella to provide some shimmer.
Patterned papers are Lawn Fawn, Flowers are Moderne Flowers from Colourific, 'Boo' is Framework Alphabet and Hello Life - both CTMH. Distress Oxide Inks are Spiced Marmalade, Picked Raspberry & Wilted Violet. Hemstitched Oval dies are Spellbinders.

Patterned papers are Lawn Fawn, Flowers are Moderne Flowers from Colourific, 'Boo' is Framework Alphabet and Hello Life - both CTMH. Distress Oxide Inks are Spiced Marmalade, Picked Raspberry & Wilted Violet. Hemstitched Oval dies are Spellbinders.
Friday, October 26, 2018
Harvey's First Birthday
There is a special little man turning one today in our family, so he needed a special card. I pulled out the Zoo Babies Giraffe from Art Impressions, and coloured him up with Copic markers. I used the Babycakes papers from Close To My Heart, because they work so well with this little guy!
 After using my sewing machine to zigzag the polka dot paper on the base with some bright orange thread, I fussy cut the giraffe out, and adhered him with pop dots:


Happy Birthday, Harvey!
Thursday, October 25, 2018
Freshly Made Sketches #360
This great sketch had me pulling out my Christmas papers last night... and I managed to get 3 of these done to add to my stash! Using some of last year's CTMH papers, and a sentiment from several years ago... along with a couple of dies that I just picked up, here's what I came up with:

 Patterned papers are Oh Deer!, Cardstock is Juniper, Olive, Chocolate & White Daisy, stamp set is Merry & Bright - all Close To My Heart. Dies are Pinecone and White Pine Needles from Dee's Distinctively.

I am using this week's sketch from Freshly Made Sketches:

Wednesday, October 24, 2018
Sketchy Saturday is back!
Sketch challenges are my favourite... so I couldn't be happier that Laurel Seabrook has brought back her Sketchy Saturdays. She does great sketches! Such a great way to have a little fun, and get another Christmas card done. I don't often use stickers out of my paper packs... but I'm determined to make use of a lot of the ones that I have. Here's what I came up with:


Patterned papers/stickers are Season's Greetings by Echo Park. Stitched Snowflake dies are Poppy stamps. Here was the sketch:
Did y'all hear that Mojo Monday is back?? That's on my list...
Friday, October 19, 2018
Colourific Butterflies
I am up on the Colourific blog today, sharing two cards using the lovely Spread Your Wings and Fly set, along with the Alphabet & Numbers:
 Now, you're going to have to forgive my photography... no matter how I edited my photo, the butterfly came out with a distinct red tone! It's much more of a wine colour like the photo below. I coloured the butterflies with Copic markers - so many possibilities and different ways they could be coloured! I fussy cut around them, and then scored down either side of the body, so that the wings bend upwards. For both cards, I used my sewing machine to zigzag the black patterned paper onto the base. The teal circle on the "Fly" card is adhered with pop dots for a little dimension.
 The Alphabets & Numbers set is such a great font! Really easy to fussy cut/paper piece like I've done here.


I was going to use the sentiments that come with the Spread Your Wings and Fly set on the front of the card... but they were busy enough already, so I mounted them on some teal paper, stamped a few butterflies in black ink, and added them to the inside of the cards.

A lot of butterfly papers are light & pastel-ish, so I love the dark, rich colours of these papers for a change.

You can find all of the Colourific stamps on the website here, or just click on the links above.
Happy stamping!

Thursday, October 18, 2018
Ai Watercolour Wooden Door - Fantasy version
This week I am teaching classes at The Crafter's Workshop in Stouffville, and we are using the Art Impressions Watercolour set: Wooden Door (Sku #4702). The stamp itself has snow on the roof, and a snowy tree that leans up against the door. Part of the class is to show how you can use your sets for more than what they're intended for - so I've done up samples for other seasons. When I began to create a spring version, I decided to do more of a fantasy scene - more like the Hobbit Door set, or the newer Fairy Tree. After stamping and painting the door and some flowers around it, I added a grassy mound overtop, making it look like a Fairy door. I used the cobblestones from the WC Cobblestone Set (Sku #5018) to add to the quaint theme.
 Here's a closeup of the door:


Wednesday, October 17, 2018
Ai Watercolour Wagon card
I've used the sweet Garden Wagon Mini Set (Sku # 4875) from the Art Impressions Watercolour collection many times, filled with spring flowers, so I wanted to try my hand at doing a fall version. I did some masking to add the two pumpkins from the WC Harvest Set (Sku # 5059), and added a few wheat strands around it:
 I am entering this into the Art Impressions current challenge, which is "Add Embellishments"!


Monday, October 15, 2018
Ai Watercolour Tractors
A few more watercolour samples to share with you today. I did both a summer & fall version using the WC Harvest Set (Sku #5059) from the Art Impressions Watercolour collection. For the summer version, I added one of the WC Rustic Cabins Set (Sku #4962) and the trees from WC Tree Set 1 (Sku #5010):
 I drew in the hillside, and painted in a few faint mountains in the background. For my fall version, I added one of the pumpkins that comes in the tractor set, and created some fall trees using WC Tree Set 1.
 Both images are matted on a dusty brown cardstock, and adhered with pop dots. I am entering my second card into the current Art Impressions challenge, which is "Add Embellishments!"


Friday, October 12, 2018
Seasonal Watercolours
Two more watercolour cards today, using the Art Impressions Watercolour stamp sets: the barn and truck are from WC Truck Mini Set; and the trees are from WC Tree Set 1. The tree branches in the truck bed are from the WC Branches Set:
 I used my Marvy African Violet marker to draw in the hillside and snow mounds, then painted in the mountains and added a setting sun and some whispy clouds.
 I used my sewing machine to add some zigzag stitching to the background papers, stamped my sentiment and popped up the image with some pop dots.
 For my second card I created a spring version of the truck, making a grassy meadow, and adding some purple flowers with the tiny flowers from the original Flowers Set.
 My upcoming class at The Workshop in Stouffville is showing how to use the same stamps to create scenes for different seasons, so I'm going to take these along as examples.


Wednesday, October 10, 2018
Watercolour Fawns
I am trying hard to get all of my watercoloured images made up into cards! This sweet fawn is from WC Mini Critter Set - part of the Art Impressions winter 2018 release. The first time that I break open a stamp set, I usually like to copy the scene on the packaging, which is pretty much what I've done here. I also used the tree from WC Tree Set 1, and bits from WC Foliage Set 3 and WC Flower Set 3:
 I did both a rectangular (4 1/4" x 5 1/2") version, and a 5 1/4" square version, and added some simple sentiments:


Happy stamping!
Friday, October 5, 2018
Hydrangea card
I am posting on the Colourific blog today, and I'm sharing a card that started out as a wreath... but ended up being a hydrangea ( ??? ). Scroll down for the details...
 I started out by stamping multiples of all three sizes of the outlined flower images from A6 Moderne Flowers, and a bunch of the outlined leaves from the A6 Leaves set on a large piece of watercolour paper. My intention was to paint them all in autumn shades, fussy cut them out, and put them together to make a wreath. But there was something about seeing 25 or so of the flower images side by side that made me think "hydrangea". So my plan did a complete about take, I found a blue that I painted them all with, and got busy cutting.
 I gradually watered down the shade of blue that I was using, making some of the blossoms lighter, and lighter still, as I knew I wanted some to be hidden behind that would be darker, or in 'shadow'. I used a bright yellow mixed with a bit of green to make up my limey/green leaves, varying the colour a bit on each one. At first glance it looks like an awful lot of cutting! But once I got going, it probably only took about 45 minutes - easy to do while you watch a little TV. I added a dot of silvery Perfect Pearls to the center of each flower, and let them dry.
I ran a couple of rows of irregular stitching around my white cardstock piece, and then started building my flower from the bottom up. I used a bit of adhesive just on the center of each flower back, so that the petals all curve up a little, giving a lovely bit of added dimension shown below:


I ran a couple of rows of irregular stitching around my white cardstock piece, and then started building my flower from the bottom up. I used a bit of adhesive just on the center of each flower back, so that the petals all curve up a little, giving a lovely bit of added dimension shown below:

By far the scariest part of putting this card together was adding those little blue spatters to the background - after all the work of stamping/painting/cutting/assembling, I was panicked that I might drop a big blob of paint onto my work! So it was definitely a less is more situation, and I stopped after getting just enough spatters to cover it. I white embossed my sentiment onto black cardstock and adhered it with a few pop dots, and called it a day. Happy stamping!

Tuesday, October 2, 2018
O Canada Birthday card
I am playing along with the Inspired By challenge today... I couldn't resist the inspiration photo, especially when I saw Laurel's card that used the O Canada collection from Photoplay. I love this paper pack, and haven't used it as much as I'd like. Since I needed a birthday card for my brother-in-law, this is what I put together:
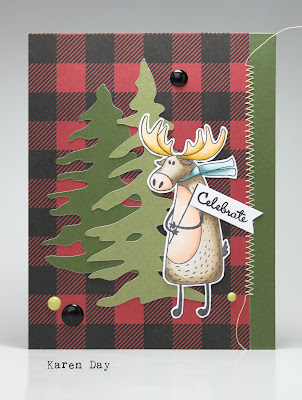


I of course, loved the buffalo plaid in the photo, along with all the little trees... and went with a moose instead of a bear or a fox. The moose is from the stamp set that matches the papers, and he's actually holding a Canadian flag, so I put a little "Celebrate" banner to cover the flag, and make it a little more birthday-appropriate.

Subscribe to:
Posts (Atom)