Wednesday, May 27, 2020

Anything is Possible with Coffee

I was able to put together a second card for the 2020 Spring & Summer Coffee Lover's Blog Hop, and wanted to do a slimline card:
 Using all product that's been around awhile... Cream & Sugar Doodlebug Designs paper, Verve sentiment & die, and Tim Holtz Blueprint Sketches from Stamper's Anonymous.
 The white circle & squares are all adhered with 3D adhesive tape to raise them up a little.
Many thanks to Amy Tsurata for putting together a fun week as always!

Saturday, May 23, 2020

A huge Art Impressions Sale!

Happy Memorial Day weekend to all of my American friends... and simply Happy Weekend to all of the rest of us!  *Art Impressions is having an amazing 33% off sale - click HERE to head over to shop on their website.  Great time to pick up your favourite stamps, stock up on watercolour supplies... you name it.  Enjoy!

Friday, May 22, 2020

2020 Spring/Summer Coffee Lover's Blog Hop

Today is the start of the 2020 Spring/Summer Coffee Lover's Blog Hop, so I dug into all my coffee themed goodies to put together a little something:
The plaid is from my favourite paper pad of the moment - Goldenrod by One Canoe Two.  All stamps and dies are from Verve - still my go-to products for coffee cards!

 The pink and silver papers behind the sentiment are both lovely and pearlescent, providing lots of shimmer along with the matte sequins.  I die cut the coffee word die and layered it 4 times to give it a little extra height.
Check out the hop - there will be hundreds of entries, and lots of fun prizes for participants :o)

Wednesday, May 20, 2020

Quilt Set card

I have a card to share using one of the Art Impressions Girlfriends' sets today.  This is Quilt Set:
 These are the lovely Goldenrod papers by One Canoe Two.  I love the colours.  The gals are coloured in Copic markers, then fussy cut and adhered with foam dots.  That pink paper has a lovely pearlescent shimmer to it, behind the image.

Monday, May 18, 2020

Snowmen cards

I am doing a lot of TV colouring during our lockdown!  So I've made a point of using my Copics to colour images that I'd stamped previously.  I had these two from Art Impressions ready to go, and paired them with some Simple Stories papers:


Sunday, May 17, 2020

Christmas Cookies

I love the "How You Bean?" stamp set from Lawn Fawn... and when I saw the Christmas Cookie Add-on stamp set, I thought it would make some very fun Christmas cards.  I did a little TV colouring this week, and was able to put together NINE of these!
 Images are coloured with Copic markers, and then I used the matching dies to quickly cut everything out.  I used up bits of older Christmas papers that I had sitting in my stash to put a few different looks together.
 On the plaid paper, I embossed the sentiment in white so that it would stand out.
 This feels so good to get a jump on my Christmas cards - I've been wanting to do a little of this while we're staying home this spring.

Lawn Fawn - Clear Photopolymer Stamps - How You Bean Christmas Cookie Add-On Lawn Fawn - Lawn Cuts - Dies - How You BeanLawn Fawn - Clear Photopolymer Stamps - How You Bean

Saturday, May 16, 2020

Inspired By

A challenge!  I haven't played along with a challenge in so long... but I had this cherry image stamped and ready to go, so when I saw the inspiration photo for the Inspired By challenge, I decided to colour it up:
This is from the Exclusive Cherry Set by Art Impressions, that is available only at Scrapbook.com (link below!).  I did a fairly quick colour of the image using my Copic markers, then cut it out with the Inside Out Stitched Rounded Rectangle die, and mounted it on some Echo Park Dots & Stripes paper.  Here was our inspiration:


Art Impressions - Clear Photopolymer Stamp Set - CherryArt Impressions - Steel Dies - Rounded Rectangle A2 Double Stitched

Thursday, May 14, 2020

Exclusive Rose Set for Watercolor Weekend

 For the upcoming Watercolour Weekend on the 
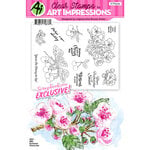
Art Impressions blog, I have coloured up the pretty rose bouquet image from the Exclusive Rose Set available at Scrapbook.com:
I used one of the Double Stitched A2 Rectangle dies to cut my Canson XL Watercolor paper, and put it into my Misti along with the image that I chose.  This allowed me to colour it in stages, using multiple colours and restamping when needed.  I used my Tombow Dual Brush Marker #725 Rhodamine Red to colour the buds and the outer petals of the roses, then switched to #993 Chrome Orange for the rose centers.  I softened the lines with a damp #1 paintbrush, then scribbled them both onto my palette and painted in the pink and orange tones, concentrating them in the crevices between petals.  I did a similar process for the leaves, stamping them first in #177 Dark Jade, pulling out the colour with my damp brush - and then restamping after colouring the veins and stems with #249 Hunter Green.  I picked up #126 Light Olive from my palette, added touches of this brighter green to the leaves, and added some #992 Sand to the woody stems.  
To finish the painting, I picked up #565 Deep Blue, and painted it as my background, concentrating it more, closer to the image.  The sentiment is from the Exclusive Daisy Set, stamped in Onyx Black Versafine ink.  After matting the image with a 1/16" black mat, I attached it to my base with 3D adhesive, then added a sprinkling of tiny white pearls.

Wednesday, May 13, 2020

Greenery Invites Set

I have the third card to share today using Greenery Invites from Art Impressions - all with gold foil using my Minc machine:
When I first went to use this stamp set, being that it is intended for weddings, I got on Pinterest to see what are current/trendy colour combos for weddings.  There was a lot of blush pink, navy & neutrals, so I knew that these papers from Pink Paislee would be perfect.
This is a 5 1/2" square card that I made by running the wreath image and sentiment through my Minc machine to add gold foil.  I die cut them both with stitched dies, matted with a matte navy cardstock, and then onto the shimmery blush square of cardstock.  The sentiment is adhered with pop dots for a little dimension.  Enjoy!


Tuesday, May 12, 2020

Greenery Invites - You're Invited

Sharing my second card today using Greenery Invites - again using my Minc machine to add gold foiling to the font and corner images:
 It's so hard to photograph glimmer!  But I think you can see in the first photo how pretty and shimmery this is in real life.  After die cutting my sentiment with a stitched square die, I mounted it on navy and then a larger square of shimmery blush cardstock.  The corner images were fussy cut and mounted with foam tape.  You can find the Greenery Invites set on the Art Impressions website, here.

Monday, May 11, 2020

Greenery Invites

Keeping my roll going sharing a card made with the new Greenery Invites from Art Impressions:
I knew from the moment I saw this set, that I wanted to do some gold foiling!  So using my Minc machine, I foiled one of the wreath images, and my sentiment.  I matted the large circle with some wonderful shimmery blush pink cardstock, and added a few gold sequins to add to the glimmer.
I'll be posting my other two cards using this set over the coming days.

Sunday, May 10, 2020

Cheryl's card

One of my sisters is lucky enough to have her birthday fall on Mother's Day every so often, so here is the card that I sent her:
 Once again, it's my current favourite stamp set: Floral Invites from Art Impressions.  I really love how this one turned out, with the bold flowers and multi-coloured greenery, coloured with Copic markers.
I die cut my image out and raised it with 3D adhesive,  onto my warm yellow card base.  I die cut a larger circle from the polka dot paper, and also adhered it to the base with 3D adhesive tape - it's a great look.  Happy Birthday to my big sis :o)

Friday, May 8, 2020

Last Floral Invite Card (for now!)

Here's the 3rd card I made with the Floral Invites set from Art Impressions - I'll show the trio of coordinating cards first, and then scroll down to see the little Thank You card on it's own.
 Making cards that coordinate, just makes me happy!
I'm pretty sure that this was 4 1/4" square (I've long since sent it on to Ai!).  Thank you cards are often a little smaller than regular cards, so I just focused on die cutting the sentiment with my hexagon stitched dies, and added one of the little sprigs coloured in Copic markers.  The background has a soft blending of Distress Oxide ink, and then was spattered with a little deep blue ink.


LinkWithin

Related Posts with Thumbnails