Showing posts with label Shaker Card. Show all posts

Wednesday, July 2, 2025

Window Shaker

I've been itching to use the new Corner Bookmark Dies from Art Impressions, and the May sketch from the Papercrafter's Inner Circle group on Facebook was the perfect project.

Scroll down to see the sketch, which features a window and flowers... so I pulled out four of the Ai paperpacks: 6012 - Basic Yellow PP, 6010 - Basic Pink PP, 6009 - Basic Green PP and 5742 - Easter PP, and started die cutting.

For the window, the frame found in the 5543 - Journal Template Die Set is a lovely, large frame that is ideal for a shaker, so I cut it out of some taupe cardstock, and after cutting a rectangle from my patterned paper, I adhered it over some clear acetate.  The panel was attached to my gingham background with 3D foam adhesive, which I also used to create an enclosed rectangle where I added my shaker bits.  Once everything was adhered to the base, the shaker was created.

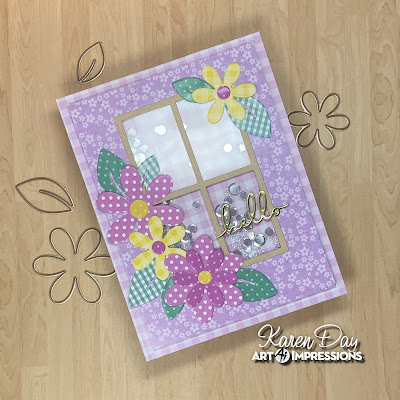
After cutting and adhering all my flowers around the frame, I die cut the Hello from the 5718 - Mini Journal Template set in gold metallic cardstock, layering it twice for extra stability, then glued it to my card.

The set also includes these cute bookmark corner dies!  I cut out a couple of them in coordinating cardstock and attached a flower to each (took me less than 5 minutes to make these!).  I'm going to include these with the card as a little something for the recipients.


Thursday, April 10, 2025

Bloom with Happiness

The February Betterpress Society plates are Bloom with Happiness.  I made my first card as another Pocket Shaker!  

I noticed that the flowers were mostly on the inner edge of the plate, and the foliage mostly on the outside.  So I decided to do some ink blending with Distress Oxide inks, using Wilted Violet on the center of the plate, then did a row of Salty Ocean and Mowed Lawn around the outside - in a sort of circular pattern.  I darkened the edges with some Rustic Wilderness, and wasn't loving the Salty Ocean, so I covered most of it lightly with Blueprint Sketch - and love the final effect.  I used the coordinating die to cut out the center portion of the image, and pressed one of the plates from the Sentiment add-on set in the same inks.

To assemble my shaker, I pressed a piece of white cardstock with a pierced plate from Altenew, and attached my sentiment to it before placing it face down in a A2 Shaker Cover from Pink & Main.  I sealed three sides of the cover, leaving the top edge open, and added Diamond Confetti (also Pink & Main) and some micro glass beads from my stash.  I don't put a ton in my shakers - as long as they move well and make noise, I'm happy.  I sealed the top edge, and adhered my pressed panel to the front, after fussy cutting around the outside of it.


I used a sturdy double sided adhesive to attach my shaker to a card base.  All supplies and a Betterpress Society subscription can be obtained through the Papercrafter's Workshop!


Thursday, February 20, 2025

Pink & Main Shaker

I just picked up some new goodies from The Papercrafter's Workshop, and quickly whipped up a shaker card using the A2 Shaker Cover (4.25x5.5"), and Diamond Confetti from Pink & Main.

I'm a patterned paper fan, and this is a great card design to show off those pretty papers that we all hoard in our stash!  I've used some One Canoe Two paper by Jen Hadfield from a few years ago - love this paper.

I cut my paper about 1/8" smaller than the finished card, put it upside down on the shaker cover, and attached the adhesive on 3 sides.  With the top end open, it's like a pocket - so I poured in some of the Diamond Confetti, along with some micro glass beads that I have, then sealed the top edge, enclosing all the confetti in my pocket.  I used some strong adhesive strips to attach it to my card base.

To create my 'present' design, I attached two strips of pink cardstock to look like ribbon on a gift, then glued on two die cut bows.  I stamped my greeting on a little tag, and tied it under the bow.  Done!


Tuesday, January 7, 2025

Gifts Christmas Card Shaker

This was my second card using the November Betterpress Society plates from Spellbinders, 'Gifts'.  They work for birthdays or Christmas, so I pressed them using Festive Berries and Lucky Clover Distress Oxide Inks on regular cardstock - and made it into a shaker card.

I used Concord & 9th cardstock and some ancient CTMH patterned paper from my stash.  The Spellbinders Essential Arches dies were used to cut the shaker, and the Holiday Blooms die cuts were added as a little embellishment.  I had a package of shaker bits from Sizzix that I used as my filler, along with some tiny glass beads.  The Foilable Sentiment is from Pink & Main.
Before running my plates through my die cut machine, I flicked water onto the inked up plates, as I wanted to see what the effect would be like with the Betterpress - and was not disappointed!  It created a kind of bokeh effect.
You can get a subscription to the Betterpress Society through the Papercrafter's Workshop.


Sunday, October 1, 2023

Snowglobe Shaker

I am sharing a fun shaker card today as my second post for the Art Impressions Watercolour Weekend, using the newly released - Snow Globe Set, but in a slightly different way!

I like to use Ranger Watercolour Cardstock when I'm painting snow, as it's a lovely bright white colour, so I cut it into a 4" x 3" piece, and stamped out my scene.  Using Tombows #969/565 for all my images, I started with the deer from the set, and then covered him with a mask.  I stamped the 5378 - WC Stone Creek Scene, leaving a space for the church, and eliminating the row of rocks that are farther back (I thought they would compete with the deer image).  This was the perfect background for my scene!  Masking the church, I coloured the smaller pine tree in the set in #249, and stamped it on either side, and then repeated them behind one of the hillsides, to look like the trees were farther away.  I also used the small leafless tree to put a few around the church as well.

Now I began to pull out the colour with a damp brush, being strategic of which direction I pulled it, making sure it was where the shadows would fall, or to simply highlight a hillside.  I went over these areas with a mixture of #565/605 - as I wanted my snow to have a more bluish hue, and I painted in areas where there would be shadows.

For the deer, I used #947 & 969, keeping it lighter on top, and adding more layers of colour to the shadowy underside.  I added a little #N55 to his hooves and antlers, and also painted this onto the door and spire of the church.  To give the rocks a little colour, I dabbed on touches of N55, 947 and 565, as I like them to have a mottled, multi-coloured look.

I softened the pine trees by going over them with a damp brush, and once dry - added touches of Dr. P.H. Martin's white paint to put some snow on the branches, and did the same to the other trees.  I used tones of #533/565 for both the stream and the sky, keeping the edges a little bit darker.  I adhered my scene onto my card base, matted with some glitter paper.  

To create the shaker, I cut the new Snowflake frame in white cardstock, as well as some white fun foam.  I glued the fun foam over my scene, then added glitter and sequins in the middle.  I added a rectangle of clear acetate over this, then glued on my cardstock frame - and my shaker was complete!  Turn on the sound, and watch my 5 second video showing the shaker:

Thanks for joining me today!  Don't forget to look for the Watercolour Design Team with two projects every Sunday on the Ai blog and other Social Media sites.  See you next month!


Saturday, October 30, 2021

Happy Birthday, Harvey!

 I have a great nephew who turned 4 this week!  And he's a bit of a jelly bean fan, so I pulled out my How You Bean? stamp set from Lawn Fawn, plus the shaker add-on kit, to make him a fun jelly-bean shaker card.  I haven't made a lot of shakers, but knew this was the right occassion.  I coloured all the beans with my Copic markers, and pulled out some Halloween paper that I've had for YEARS!  It made for a fun card:

I cut the jar die out of thin craft foam, and layered it along with 3 layers of cardstock to create the frame, added in some acrylic beads and glitter along with a handful of individual jellybeans.  I love the little Lawn Fawn face stamps!  The one with the moustache cracks me up!  I added a layer of acetate before topping it with the stamped images.  It makes a nice rattling noise when you shake it, and the beans jump all over the place.  I think Harvey will love it.
You can find all the Lawn Fawn stamps and dies at the Papercrafter's Workshop!


Thursday, December 8, 2016

Shake a Little

The Art Impressions design team are all sharing projects made with the 2016 non-holiday shakers (you've seen the cute Halloween & Christmas ones already!), so today I have a 3-dimensional card using Rock & Roll Mini Shaker (Sku #4795):
 This set is designed to go with the Mini Action Wobbles - and one is included with the set!  I first stamped the base image on my cardstock, and then stamped just the upper body & leg, which is a separate stamp, and there is a die to cut it out.  Then I mounted the die cut onto a Mini Action Wobble and attached it onto the base image so that she wiggles and shakes on her rollerskates!  There are two sentiments: "It's your Birthday!" and "Rock & Roll" which I stamped on the inside of the card.  **Also included in the set are the three small star dies and the "Zooom!" word die!  I love these - the perfect finishing touches.  I cut out a cloud die, added the zooom & a star, then popped it up on a pop dot behind her skate.
 Head on over the Ai blog to see what the rest of the team has created, and while you're there, you can link up your project with our latest challenge which is "Shake a Little" we want to see your cards with movement!
Copics used:  E37, E34, E31, E18, E07, E02, B95, B93, B91, BG18, BG15, BG13, BG11, R59, R35, R32, R30, C5, C3, C1, B0000

Tuesday, October 18, 2016

Quivery Mini Shaker

 Art Impressions has really hit one out of the park this year as far as Halloween stamp sets go!  Is this not the most adorable set?  Look at their startled expressions!!  And of course the sentiments are SO fun... Here are a couple of cards using Quivery Mini Shaker (Sku #4793):
 This sweet set, is actually a double shaker!  Both the little pig and little duck come as separate images with matching dies, so I stamped and coloured the main base image, as well as the upper bodies of the pig and duck.  I then cut out the pig and duck with their dies, and popped them up with the new Mini Wobbles so that the cards shiver & shake a little.  Here's another version:
 Now the other fun things that are included in this set are four small accessory dies - the two bats, a spider and a little pumpkin - the perfect little details to finish off your cards.
 The current challenge on the Ai blog is Till You Wobble - we want to see your creations with an action Wobble!
Copics used: Greys - C7, C5, C3, C1, C00
Oranges - YR18, YR16, YR15, YR12, YR00
Yellows - Y38, Y35, Y32
Pinks - R24, R22, R20
Greens - YG05, YG03, YG01
Purples - V09, V06, V05, V04


Thursday, February 18, 2016

Shake, Rattle & Roll!

We have a brand new challenge on the Art Impressions blog today - "Shake, Rattle & Roll!"  we want to see your cards with movement.  I have a sweet Easter shaker card to share with you today with some tips on colouring Easter eggs.  My card features the wonderful new clear stamps in Happy Easter Set (Sku #4754):
 This is a 4 1/4" square card, and I'll share how I put it together in a minute.  First I want to tell you how I coloured my eggs.  Here are the Copics that I used on all of my images.  For the shaker card, I just used Y11, R81, B21 and BV01 - and you'll notice that all of the colours that I selected end with a "1".
 My intention was to recreate the look of the hand dipped eggs that we all made as kids.  As long as you select colours that end with the same number - they will blend together, without getting 'muddy'.  I tried various combinations first to see what I liked - all I did was overlap each of the colours by about 1/8".  I went over some of the colours twice, but there is not a lot of repetitive blending involved - let your work sit for a little while, and the colours blend themselves together really nicely.
 As always - test your combos on a bit of scrap cardstock first to make sure you like the effect.  Here's a bit of a rainbow effect that I made using all six colours together:
Here are my finished bunnies:
 To make my shaker, I taped together two different circle dies, to make a 1/4" frame.  I used some leftover packaging that I had on hand, that is about 1/16" thick.  I cut the frame out three times and glued them together in a stack, then filled the middle with sequins, added a circular piece of acetate, and then covered it all with a pink cardstock frame:

 Here you can see my stacked cardboard frames.  I placed the sequins in the middle before adding the acetate & pink cover:
After fussy cutting my bunny out, I glued her to the edge of the frame, and tied some Baker's twine around my card.  Enjoy!
Be sure to enter your creation over on the Ai blog - there are always fabulous prizes to be won!
Copics used: E53, E51, E50, C1, C00, RV10, R20, Y11, R81, BV01, B21

LinkWithin

Related Posts with Thumbnails