Showing posts with label Therm O Web. Show all posts

Tuesday, April 4, 2017

Therm O Web & Teachers Rule

 I am so happy to be sharing more wonderful Therm O Web products with you again!  Today I'm using one of the new Work & Play stamp sets from Art Impressions called Teachers Rule Set (Sku #4901).  And of course I knew that the cards would need a gold star or two from the teacher...
Now there are NINE teachers in my immediate family (I've actually been taught by my Father, my Mother & my oldest sister!) so this stamp set is going to get a pretty good workout from me. I've been hoarding these "Schoolhouse" papers from October Afternoon for a while, so I put them to good use.
I ran the Therm O Web Foam Adhesive through my Cuttlebug with the Art Impessions star dies from Rock & Roll Mini Shaker (Sku #4795), peeled off one side of the adhesive and pressed them into iCraft gold Deco Foil, then stuck them onto my projects.  I did some zigzag stitching in gold thread for a little added shimmer.
My sentiments are popped up with Therm O Web's 3D Foam Strips.  I'll be back with a few more Therm O Web products for this month's Tuesday Threads post in a few weeks.  Here's what I used today:
The Ai Design Team will be sharing Therm O Web products all week here on the blog, and the Therm O Web team will be using Ai products (there's a little giveaway on their blog, too - you can check it out here!)
a Rafflecopter giveaway
Copics used - Skin tones E13, E11, E00, E000
Reds - R37, R35, R32, R30
Greens - BG75, BG72, BG70, YG05, YG03, YG01
Greys - C3, C1, C00
Browns - E57, E55, E53, E51, E50
Yellows - Y26, Y23, Y21, E50

Tuesday, January 17, 2017

Fabric Boxes

 I'm back with the January edition of Tuesday Threads with Karen on the Art Impressions blog... and this is the most fun that I've had sewing in a while!  I came across this idea on Pinterest, and knew that these little fabric boxes would be amazing in the Art Impressions Shop Hop fabrics that are available through Henry Glass Co.

I intended to make just one... and ended up with four!  Trust me, if time wasn't an issue, you'd be seeing about a dozen of these.  I started with the largest, and just kept making them smaller!

I'm not going to give you a full tutorial, just a bit of info - if you're interested in making some of your own, just do an internet search for "fabric boxes" and there are some very helpful, easy-to-follow tutorials out there.  But I've got lots of photos to share (they were just so cute... I kept snapping pictures!)
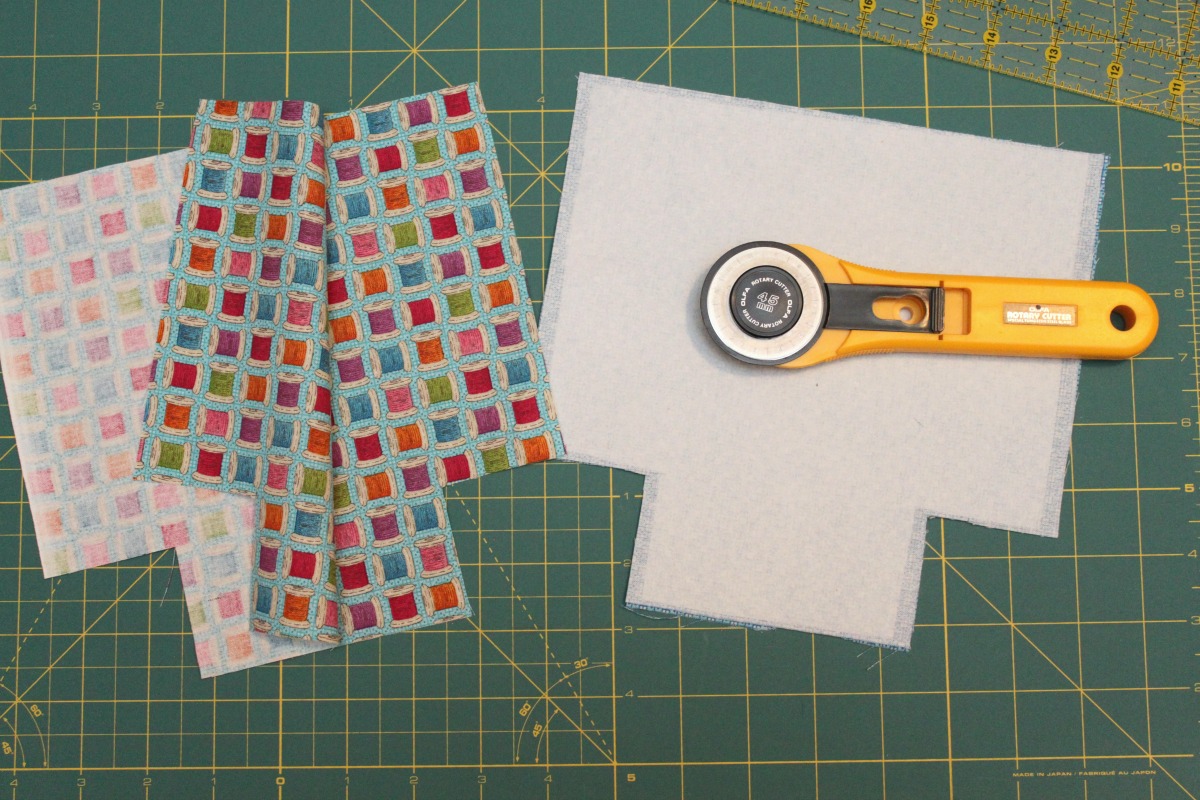
The largest box was made by cutting two 12" squares of fabric, and two of contrasting fabric for the lining.  I cut out 3"x 3" squares from the two bottom corners, and then ironed on Therm O Web's medium weight fusible tricot interfacing onto both lining pieces.  I sewed down the sides and across the bottom, then mitred the corners to form the box shape - on both the outer and lining pieces.  With right sides together, I sewed the top rim of the box to the lining, leaving a 2" opening to turn them inside out, which I then hand sewed shut.  Here's what it looks like:

 I rolled down the top edge to form a bit of a cuff, and to show off the contrast lining.
 Oh, the possibilites of what you could use these for in your sewing room!  Or your craft room... or the kitchen... or as gift packing...


 The largest started with 12" squares of fabric, and the others are 10", 8" and 6" squares of fabric respectively, with the corners getting smaller for each size.  Adding the Therm O Web interfacing to the lining worked really well, giving just the right amount of stiffness and support to the boxes.

I'll see you next month with another fun Ai fabric project.
Happy sewing!


Tuesday, November 8, 2016

Reindeer Mini Shaker

 I can't get enough of these cute Mini Shakers from Art Impressions!!  These are so quick and easy to create, that they are great when you want to create multiples (I made six of these this weekend!).  Here is Reindeer Mini Shaker Set (Sku #4800):

I kept my card design pretty simple, since I was making a bunch and wanted them done in an afternoon.  I used the amazing Therm O Web Deco Foil Transfer Sheets along with the Therm O Web Deco Foil Foam Adhesive to make his nose really shine!  Then I put it onto a Mini Action Wobble to give him a little movement.  I also used the iCraft Supertape with the transfer sheets to create my shimmery stripes, here's how:
Supertape is a strong, clear, double-sided adhesive, so I pulled out enough to lay across my paper, and trimmed it to the right length with my craft knife.  I also cut a piece of the red Deco Foil slightly larger than my strip of tape:
I pulled off the red backing, placed the Deco Foil over the tape (shiny side up!) and burnished it with my finger:
Here's the end result when I pulled the Deco foil strip off - the red foil transferred completely onto the Supertape.  You won't believe how EASY this is, and the results are just amazing!
Here's another shot where you can see the red foil nose & stripes a little better:
Happy stamping!
Copics used: E55, E53, E51, E50, E44, E43, E41, R27, R24, R22, R20
a Rafflecopter giveaway


Thursday, November 3, 2016

Art Impressions Christmas

The Art Impressions design team are helping to launch four new clear acrylic Christmas stamp sets today on the Ai blog - and they are such cute, fun themed sets - you're going to want to get all of them!  I am featuring Dairy Christmas Set (Sku #4789), which includes four images and five fun sentiments:
 We are also partnering this week with Therm O Web - and I've used their wonderful gold Deco Foil and Deco Foam adhesive to create the glimmery gold snowflakes and stripes on my cards.
This was SO easy, and the results were amazing.  *Check out my last post on Tuesday, Nov.1st to see how I made my snowflakes! Here are closeups of each of my cards:


 Our current challenge on the Ai blog is "Prep for Christmas"!  We want to see your holiday creations, so head on over to link up your projects - there are always wonderful prizes to be won!

Tuesday, November 1, 2016

Chris-mouse Mini Shaker

Hello Ai fans!
I am having a great time making cards with the new Mini Action Wobbles!  And of course the new Ai Mini Shakers are all designed especially for them... here is a quick card using Chris-mouse Mini Shaker (Sku #4796):
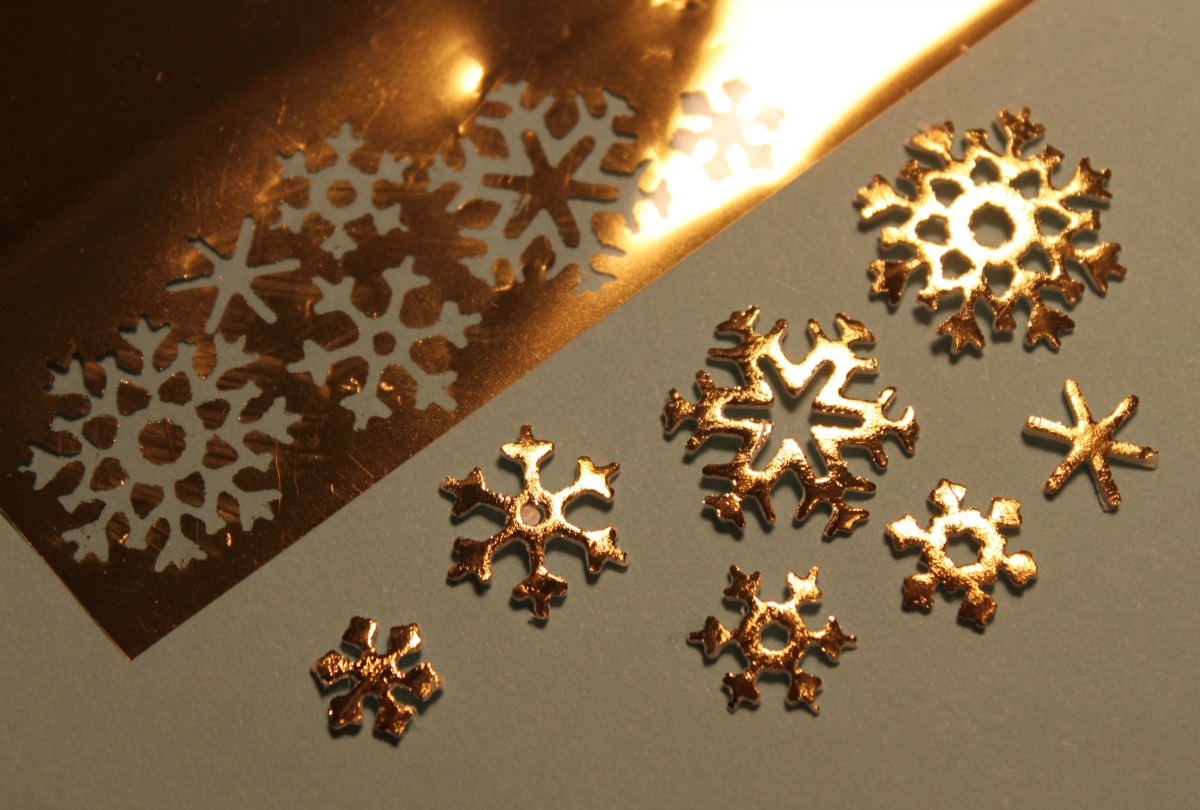
This week, the Ai Design Team are all using Therm O Web products on our creations, so on today's card, I've used the Deco Foil Foam Adhesive along with Gold Deco Foil Transfer Sheets to give the glimmer to my mouse's jingle bell.  I also used the foam to die cut snowflakes - and they turned out SO amazing!  These are the Ai Snowflake Dies (Sku #4804), and they are quite small and detailed.  I started by running my Snowflake Dies and the Foam Adhesive through my Cuttlebug:
The foam is sticky on both sides, so I peeled the backing off one side of each snowflake, and laid them down onto the matte silver side (the back side!) of the gold foil, and pressed down:
I flipped the foil over, and gently burnished the foil onto the snowflakes with my finger.  Then I pulled off the foil and here are the results:
They're like little metallic foam stickers!  All I did was peel off the backing and place them onto my completed card.  What a great way to add foil touches to your projects!
Our current challenge on the Ai blog is Prep For Christmas!  We'd love you to share your holiday creations with us - there are always fabulous prizes to be won.  And don't forget to enter the great giveaway, below! Happy stamping!
a Rafflecopter giveaway
Copics used: C5, C3, C1, C00, R21, R20, B00


LinkWithin

Related Posts with Thumbnails