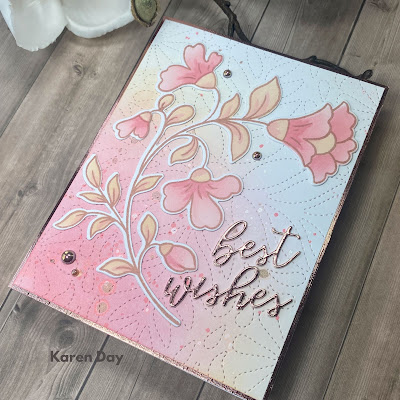
I tried a bit of an experiment today! I used the reverse foil of a background plate that didn't turn out very well. There were sections of it that were quite good, and others not so much - but I was hoping it would give a bit of a distressed vibe.
Thursday, August 6, 2026
Reverse Foil Rose
Saturday, June 20, 2026
Painted Daisies
I am revisiting an older set from my craft room. This is Painted Daisies from Pinkfresh Studio.
Thursday, March 19, 2026
Ink Blended Golden Bloom
My second project with the January Betterpress Society plate is using the stencils that came with it.
I wanted to do a two-tone blend on each petal, so am not using the stencils as they were intended, but it just meant repeating the same blend on each petal on each stencil. And I wanted each flower to be different!
I pressed the plate on a Porcelain Cotton Card panel with Betterpress Black ink, and stenciled with Pinkfresh Studio inks (Slumber/Blue Jay/Mint/Passion Fruit). The sentiment is included with the main plate. I felt the upper left corner was a little stark, so took my blue blending brush, using just the remaining ink on the brush, and added a little soft blending. A few black jewels finished it off.
Sunday, March 15, 2026
Butterfly Thank You
Saturday, February 14, 2026
Sweet Leaves Valentine
I have owned the Sweet Leaves Frame stencil & die set from Pinkfresh Studio for a while, and had stenciled up a panel, and never used it - until now! I still make valentines for my adult children, and decided this would be a pretty one for my daughter. I used the coordinating die to cut out the images, not realizing until I was assembling the card, that the frame actually has a right side up - I thought it was the same in either direction. You can see across the middle, where the die/stencil don't line up! Oh well, my daughter will still appreciate the colours and sparkle.
Sunday, December 14, 2025
Classic Twinkle Tidings
My second project with the October Betterpress Society plate, Twinkle Tidings was a more classic colour combo.
Tuesday, November 25, 2025
Skiing By
I made up these cards several months ago, and actually stamped the images several years ago!! But today I finally added the sentiments and a little glitter to finish them off.
Tuesday, November 11, 2025
Folk Floral Stem Wedding Card
The Folk Floral Stem set from Pinkfresh Studio is my go-to for wedding cards. This week I did it in their soft peach/pink tones, gold embossed the outline, and cut it out with the coordinating die.
Saturday, August 9, 2025
A2 Floral Notes
When I created the slimline card that I posted yesterday with Floral Notes by Pinkfresh Studio, I had created a second stenciled image, and decided to make it up into an A2 card.
This one was fussy cut, and chopped in half to create a whole new look. I chose a lighter shade of pink for my base, and cut the Stitched Scalloped Rectangles die from Pinkfresh Studio from some matte silver cardstock. I used the same for the Serenade Sentiments from Spellbinders.
All of my die cut pieces were layered several times to give them some extra stability as well as depth. I adhered my florals down with some thin 3D foam adhesive.
Friday, August 8, 2025
Slimline Floral Notes
So happy to be pulling out some older product from my craft room! This one is a favourite of mine, it's the Floral Notes stamp and stencils from Pinkfresh Studio.
I stamped the slimline image in grey Archival ink, which gave an overall softer feel that I love. I used the coordinating stencils with five Distress Inks (Scattered Straw, Dried Marigold, Pink Raspberry, Shabby Shutters and Mowed Lawn) to add in the blended colours.
I spattered the image with silver metallic paint, and added the silver die cut Serenade Sentiments by Spellbinders, and a few gems.
Thursday, June 26, 2025
Ink Swiping with Inkspired Wishes
Well this was fun! I tried something new (to me!) with the April Betterpress Society plates, 'Inkspired Wishes'. I thought it would be the perfect set of plates to try some ink swiping.
I used all four of the plates in the set, along with five Pinkfresh Studio ink cubes in a rainbow pattern. Each ink was randomly streaked across the plate, overlapping a little with the other colours - enough to cover each plate, some areas being thicker than others.
I huffed a little before pressing onto regular white cardstock, and the results were gorgeous! I inked up one of the sentiments from the set in Hickory Smoke Distress Oxide ink, then matted it and my main panel with a 1/16" grey mat. A few irridescent discs from Pink & Main added a little extra sparkle.
You can get a Betterpress Society subscription from The Papercrafter's Workshop.
Monday, June 9, 2025
Wedding cards
I have two cards to share today that are remakes of cards of mine. A friend picked them off of my Instagram feed, as she needed a couple of wedding cards. I remade both of them with a few tweaks:
This is the Fresh Picked Buttercups die set from Spellbinders, remade exactly, just with the silver metallic sentiment from the Serenade Sentiments dies.
The slimline card had a few more changes, the stenciling was the same, but I added two of the white sprigs, changed the sentiment, and added a few blue iridescent jewels.
Tuesday, April 15, 2025
Chrysanthemum Slimline
The Chrysanthemum Slimline stamp set from Pinkfresh Studio is one that I haven't used in a while - but I adore how simple cards look just amazing with it. It's intended as a slimline set, but works really well cut down as an A2.
I stamped the outline in Versafine Onyx Black, and used several Pinkfresh Studio inks with the coordinating stencils to colour it in. After trimming the panel down, I matted it with a 1/16" black mat, and attached it to the white card base.
The sentiment is from the You Are Everything Sentiments set from Spellbinders, popped up with 3D foam adhesive.
I am playing along with the April Pinkfresh Studio Challenge - Floral theme!Saturday, April 12, 2025
Beautiful Blooms
As ever, I'm on a quest to use up the extra bits and pieces that are sitting around my craft room. I've had these die cut pieces from Pinkfresh Studio's Beautiful Blooms coloured up for a few months, so I am happy to get them put onto a card!
The blooms were all inked with Pinkfresh Studio inks, and I paired them with a sentiment from a different PFS set, Charming Floral Border - that I white embossed onto some black cardstock.
I mounted the blooms on some patterned paper from my stash, and then onto some pale green cardstock. A few black jewels finished it off.
I am playing along with the Pinkfresh Studio April challenge - which is Floral Frenzy!
Monday, April 7, 2025
Folk Floral Stem Wedding Card
I am in need of a wedding card, so I pulled out the Folk Floral Stem set from Pinkfresh Studio.
I stamped the image in Lisa Horton Crafts Copper Pot ink (lovely metallic shimmer!), then used the coordinating stencil to shade it in using 3 Pinkfresh Studio ink colours. It was cut out with the coordinating die, and layered with another white die cut to give it some extra stability.
For the background, I ink blended the same three colours onto some white cardstock, then ran it through my die cut machine with the Dotted Tile Debossing Cover Plate from Altenew - which gives it the pierced design. I spattered it with some Frayed Burlap Distress Spray and some of the matching inks. To complement the warm colours, I mounted it onto a panel of rose gold metallic cardstock, that also shows through the tiny perforations on the panel. I used the same cardstock to cut out the Scripty Sentiment dies from Spellbinders, and added two layers of cardstock to bulk them up a bit.
After adhering everything, I added a few champagne pearls from Pinkfresh Studio to finish it off.
Sunday, March 16, 2025
Citrus Bloom Wreath
I've had these bits and pieces of the Citrus Bloom set by Pinkfresh Studio, stenciled and die cut - in my stash ready to go for a while. I was debating on putting them into a wreath shape, and settled on a crescent moon style of wreath instead.
I pulled out my favourite shade of dark blue cardstock, and decided on a square card with a cut out circle center. The white background was a bit stark, so I pulled out my Slumber ink that I'd used in the stenciling, and inked the center area of my card base.
I arranged the pieces around the edge of the opening, and glued them down with my Bearly Arts glue, then attached it to my card base with 3D foam adhesive. I'm using the Serenade Sentiments die set from Spellbinders, and cut the words twice, layering them for a little dimension. They were adhered into the center of the circle. I splattered a little gold paint to finish it off.