Showing posts with label Art Impressions Try-folds. Show all posts

Sunday, April 28, 2024

Messy House

 I have an oldie to share today!  This is 4452 - Messy House TF, one of the old Try-fold stamp sets from Art Impressions.  I found it as far back as 2014 here on my blog - used both as I have today, or with the 3 folded card as it was intended to be used.  This was sitting in my stash uncoloured, so I pulled out my Copics and put this together to gift to a friend:


Sunday, November 18, 2018

Pamper Your-shelf

One of the managers at the library where I work, always brings me a Tim's coffee on the Saturdays that we work together... and I bring her a card.  So last night I pulled out this stamp & die set from Art Impressions and put two of these together:
 This is one of the sweet Mini Try-fold sets called Pamper Your-shelf (Sku #4853) - and this is what it looks like when you pull it out of the envelope.  After untying the bow:
 This is the top layer, which allows you to look deep inside the bookshelf, then open the top layer:
 Here is the middle, and open it up to see...
The sweet little mouse reading a book in the middle.  Perfect for a librarian!
After colouring the images with Copic markers, I lined the inside flaps with patterned paper to hide the marker bleed-through, and recut the openings with the dies.  I mounted the try-fold onto a 4 3/4" square of cardstock and another coordinating piece of paper.  I adhered the organdy ribbon to the back of the card and tied it around the front.  You can find all of the Mini Try-folds on the Art Impressions website, here.

Thursday, June 2, 2016

Another Cat Lady Try-fold!

Well it certainly feels like summer now that we're in the month of June... did you happen to see our new OCS June challenge that was posted yesterday?  If not, head over to the One Crazy Stamper blog, and you can see all of the inspiration brought to you by the entire OCS Design Team.  I am using the fun Cat Lady Try-fold set by Art Impressions today.

I adore colouring with Copic markers, so Try-folds are perfect cards for me, as that's pretty much all there is to it!  I've got a few pictures to show how each of the panels look:


 All of the cutting/scoring/stamping instructions are included with the stamp set, so assembly is quick & easy.  You'll notice that I add patterned paper to the back of each flap, to hide the slight bleed through by the Copics.  Lora has quite a selection of Art Impressions stamps in the One Crazy Stamper store, you can find them all here.
Onyx Black Ink by Versafine

Tuesday, May 31, 2016

Shoppes Try-fold cards

 I have a couple of Art Impressions cards to share today!  This is the first time that I've coloured up the Shoppes TF Set (Sku #4339):
 After untying the ribbon, here is what the try-fold looks like:
 And here is the inside, with both side flaps open.  I backed the two side pieces with some patterned paper to hide where the Copic markers bled through.  The set includes all three images, plus the sentiment:
 All of the images that come in the set can be used individually on regular cards, so here is one using the main image:
There are quite a few Try-fold sets available in the Art Impressions store - you can find them all here!
Copics used: Greens - G46, G43, G40
Yellows - Y26, Y23, Y21, E50
Reds - R27, R24, R22, R20
Blues - B26, B24, B23, B21, B0000, B000
Browns - E47, E44, E43, E41
Greys - C7, C5, C3, C1, C00


Thursday, May 26, 2016

Brand new Mini TryFolds from Art Impressions!

Art Impressions is launching two brand new Mini Try-fold sets today, and I am sharing a step by step tutorial here and on the Ai blog.  Warning, photo alert!!  I wanted to show you exactly how the set works, so bear with me!  Here's my card:

I'm so excited to share the new Ai Mini Try-folds with you today!  These make the absolute prettiest cards that you can imagine.  I have all kinds of photos to share, with step by step instructions, so grab your coffee, and scroll down a ways to see how easy these are to create.
 I am using Blessings To You MTF (Sku# 4758).  The set includes 3 images, a sentiment, and two small dies, along with complete instructions for cutting and stamping on the back of the package.
 My cardstock is 4 1/2"x11" and is scored into thirds.  I stamped the largest image, centered on the right panel, and then placed the larger die over the opening in the middle of the image.
 After running it through my Cuttlebug, I folded the card sides in, and traced lightly around the opening with a pencil, onto the cardstock flap underneath.  This allows me to see where the next image should be stamped.
 With the top flap open, here you can faintly see where I'd traced through the opening, and now have stamped the second image over the pencil lines.  Then I will fit the smaller die into the center of this image, and run it through my machine.
 Once more, I will trace around the opening through to the bottom panel, which is the inside of the card.
Look closely!  You'll see the faint pencil outline which shows me where to position the small bunny image.  I put both the bunny and the sentiment onto the same acrylic block and stamped them over the pencil shape.
 So after stamping the bunny - this is what the card looks like with all of the panels folded.  The positioning of the images does not have to be exact - the idea is that you want to see a glimpse of all three layers when the card is folded shut.  Here are the layers coloured with Copic markers:


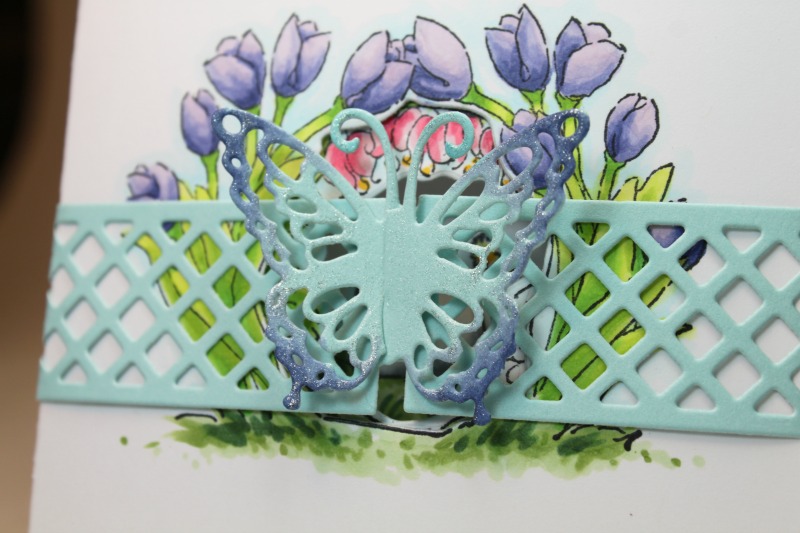
 In addition to the two Mini TF sets, we are also launching two new Clasp dies designed especially for the Mini TF's.  I'm showing Butterfly Clasp Die (Sku #4748):
I secured the die onto my cardstock with some washi tape, so that it would stay in place.  I only have the shorter base plate for my die cut machine, so I ran it through once, then turned the die around and ran the other end of it through - the tape kept the die from moving around.
All of the Ai dies cut beautifully.  The clasp simply wraps around the Mini TF, and there is a small slit on each butterfly that allows them to interlock, forming a belly band to keep the Try-fold closed.  I used my purple Copics to tint the edges of my butterfly, and then coated him with some Wink of Stella so that he shimmers.  Thanks for hanging in there through all of my photos!  Enjoy!
Copics used: BV04, BV02, BV01, BV00, BV000, YG05, YG03, YG01, YG00, G46, G43, G40, R35, R32, R30, C3, C1, C00, B000, B0000, Y35, Y32, Y11.

Thursday, December 31, 2015

Bonus New Year's Eve post!

I was scrolling through a few card photos... and came across three that I don't think I've posted this year.  So I thought I'd sneak them onto my blog as my final post of 2015.  Here are two spinners that I made for Art Impressions last summer, and a try-fold I did about a year ago:


Thanks to everyone who stops by my blog now and again - I appreciate the comments, and hopefully I've given you a little inspiration along the way.  I'm already working away on new projects for January, and look forward to seeing what the rest of you are busy making this year.  Have a very Happy New Year!

Tuesday, August 4, 2015

Tuscan Try-fold

I am sharing a couple of cards made with one of the Art Impressions 2015 Try-fold sets: Tuscan TF Set (Sku #4580):
I remember the first time that I was making a Try-fold card, thinking how difficult it was going to be (NOT!) and now they're one of my favourite cards to make.  The cutting & stamping instructions are all included with the packaging.

 I often give wine as a gift, so was thrilled when Ai came out with this set!  The inside sentiment says "Wishing you everything under the Tuscan sun"
Try-fold stamps are so versatile, in that each of the three image stamps can be used individually.  I stamped and die cut just the villa image to make an all occasion card below:
 Have you entered our Card Set challenge yet?  You've still got plenty of time - we'd love to see what you come up with!  Happy stamping!
Copics: Sky - B23, B21
Villa - E35, E33, E31, E51, E15, E08, E02
Greens - YG03, YG01, YG99, YG97, YG95, YG93, YG91
Browns - E57, E55, E53, E51
Grapes - BV08, BV04. BV02, BV01
Greys - W5, W3, W1, W00
Reds - R59, R24, R22, R20


LinkWithin

Related Posts with Thumbnails