I've had the "accessory" set for the Crazy Birds for a little while now, but haven't used it... so when I set out to make a few Father's Day cards, I knew that there were a few male accessories that would fit the bill. So here are a couple of cards that I made for my Dad & Husband:
I used FDMD from Art Impressions for the sentiment, and for the second one, it says "Happy Father's Day" on the inside, and I popped the image up on pop dots:
Stamp sets are FDMD by Art Impressions, Crazy Birds and Crazy Things by Stampers Anonymous; Inks are Memento Tuxedo Black & Versafine Onyx Black; Copic Markers; Patterned papers are You Rock by Close To My Heart.
Thursday, June 9, 2016
Tuesday, June 7, 2016
Lawn Ranger Father's Day cards
Father's Day is just a few days away, so I have a couple of fun masculine cards to share today that you could make for the Dads in your life. Here is Art Impressions' Lawn Ranger Set (Sku #4102):
The cards are both 5 1/2" square, and are using sentiments from FDMD set (Sku #4454) - this is a great little set to have on hand, that has 3 sentiments each for Father's Day and Mother's Day.
There are all kinds of wonderful masculine images in the Ai store - you're sure to find the perfect one.
Copics used: Skin tones - E37, E34, E31, E13, E11, E00, E000, R20
Greys - C7, C5, C3, C1, C00
Greens - G07, YG05, YG03, YG01, YG00
Blues - B97, B95, B93, B91, B000, B0000
Reds - R27, R24, R22, R20
Yellows - Y26, Y23, E50
Browns - E57, E55, E53, E51
Thursday, June 2, 2016
Another Cat Lady Try-fold!
Well it certainly feels like summer now that we're in the month of June... did you happen to see our new OCS June challenge that was posted yesterday? If not, head over to the One Crazy Stamper blog, and you can see all of the inspiration brought to you by the entire OCS Design Team. I am using the fun Cat Lady Try-fold set by Art Impressions today.
I adore colouring with Copic markers, so Try-folds are perfect cards for me, as that's pretty much all there is to it! I've got a few pictures to show how each of the panels look:
All of the cutting/scoring/stamping instructions are included with the stamp set, so assembly is quick & easy. You'll notice that I add patterned paper to the back of each flap, to hide the slight bleed through by the Copics. Lora has quite a selection of Art Impressions stamps in the One Crazy Stamper store, you can find them all here.
I adore colouring with Copic markers, so Try-folds are perfect cards for me, as that's pretty much all there is to it! I've got a few pictures to show how each of the panels look:
All of the cutting/scoring/stamping instructions are included with the stamp set, so assembly is quick & easy. You'll notice that I add patterned paper to the back of each flap, to hide the slight bleed through by the Copics. Lora has quite a selection of Art Impressions stamps in the One Crazy Stamper store, you can find them all here.
Found at OCS: Cat Lady TF by Art Impressions
Onyx Black Ink by Versafine
Wednesday, June 1, 2016
One Crazy Stamper June Challenge
We're kicking off June with a whole bunch of inspiration for you on the One Crazy Stamper blog! Our challenge is Anything Goes, just no digi stamps, please! I am using one of the Ai People stamps from Art Impressions. Here is Skinny Yet set:
I coloured her with my Copic markers (I love colouring spherical objects!), then popped her up on some 3D Foam adhesives, and paired her with these fun papers from Echo Park's Sweet Summertime line. Be sure to visit the OCS blog to see what the rest of the DT has to share today, and you have all month long to play along with our challenge. Here's what you can find in the OCS store:
Tuesday, May 31, 2016
Shoppes Try-fold cards
I have a couple of Art Impressions cards to share today! This is the first time that I've coloured up the Shoppes TF Set (Sku #4339):
After untying the ribbon, here is what the try-fold looks like:And here is the inside, with both side flaps open. I backed the two side pieces with some patterned paper to hide where the Copic markers bled through. The set includes all three images, plus the sentiment:
All of the images that come in the set can be used individually on regular cards, so here is one using the main image:
There are quite a few Try-fold sets available in the Art Impressions store - you can find them all here!
Copics used: Greens - G46, G43, G40
Yellows - Y26, Y23, Y21, E50
Reds - R27, R24, R22, R20
Blues - B26, B24, B23, B21, B0000, B000
Browns - E47, E44, E43, E41
Greys - C7, C5, C3, C1, C00
Sunday, May 29, 2016
Freshly Made Sketches & Inspired By
I made a card for two challenges this morning... I am using sketch #238 at Freshly Made Sketches, and am playing along with this week's Inspired By All the Little Things lovely teacup photo that Tracey McNeely chose:
I used one die and three Verve stamp sets, and decided to move the sentiment to the top corner to balance things off a little. I popped up the entire white panel as well. Here was our inspiration photo:
And the sketch:
Patterned papers are Bundle of Joy by Echo Park, and Wings by Close To My Heart; Stamp sets are Better Together, Sweet Treats and Coffee by Verve; Leafy Sprigs dies by Verve; Inks are Orchid Bouquet by Close To My Heart; Rich Cocoa by Memento & Onyx Black by Versafine; Licorice Opaque Pearls by Close To My Heart; Flowers from my stash.
Thursday, May 26, 2016
Brand new Mini TryFolds from Art Impressions!
I'm so excited to share the new Ai Mini Try-folds with you today! These make the absolute prettiest cards that you can imagine. I have all kinds of photos to share, with step by step instructions, so grab your coffee, and scroll down a ways to see how easy these are to create.
I am using Blessings To You MTF (Sku# 4758). The set includes 3 images, a sentiment, and two small dies, along with complete instructions for cutting and stamping on the back of the package.
My cardstock is 4 1/2"x11" and is scored into thirds. I stamped the largest image, centered on the right panel, and then placed the larger die over the opening in the middle of the image.
After running it through my Cuttlebug, I folded the card sides in, and traced lightly around the opening with a pencil, onto the cardstock flap underneath. This allows me to see where the next image should be stamped.
With the top flap open, here you can faintly see where I'd traced through the opening, and now have stamped the second image over the pencil lines. Then I will fit the smaller die into the center of this image, and run it through my machine.
Once more, I will trace around the opening through to the bottom panel, which is the inside of the card.
Look closely! You'll see the faint pencil outline which shows me where to position the small bunny image. I put both the bunny and the sentiment onto the same acrylic block and stamped them over the pencil shape.
So after stamping the bunny - this is what the card looks like with all of the panels folded. The positioning of the images does not have to be exact - the idea is that you want to see a glimpse of all three layers when the card is folded shut. Here are the layers coloured with Copic markers:
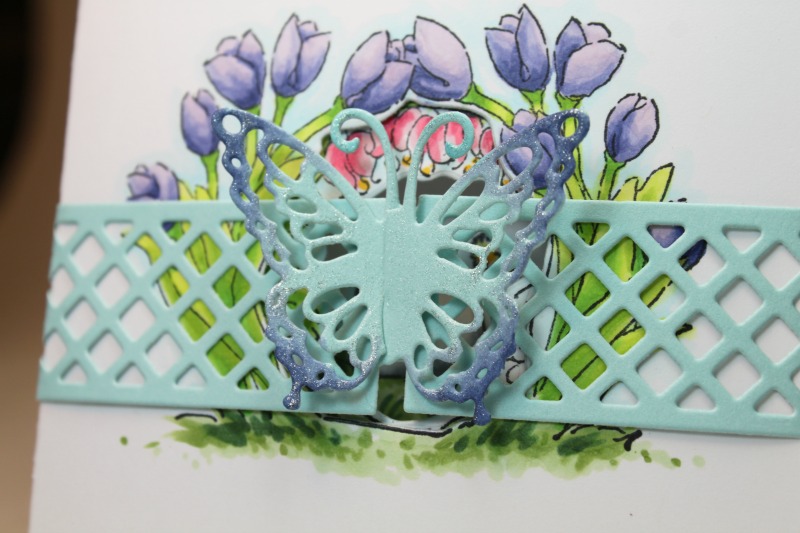
In addition to the two Mini TF sets, we are also launching two new Clasp dies designed especially for the Mini TF's. I'm showing Butterfly Clasp Die (Sku #4748):
I secured the die onto my cardstock with some washi tape, so that it would stay in place. I only have the shorter base plate for my die cut machine, so I ran it through once, then turned the die around and ran the other end of it through - the tape kept the die from moving around.
All of the Ai dies cut beautifully. The clasp simply wraps around the Mini TF, and there is a small slit on each butterfly that allows them to interlock, forming a belly band to keep the Try-fold closed. I used my purple Copics to tint the edges of my butterfly, and then coated him with some Wink of Stella so that he shimmers. Thanks for hanging in there through all of my photos! Enjoy!
Copics used: BV04, BV02, BV01, BV00, BV000, YG05, YG03, YG01, YG00, G46, G43, G40, R35, R32, R30, C3, C1, C00, B000, B0000, Y35, Y32, Y11.
Subscribe to:
Posts (Atom)