I am using a Unity Stamp Co. set today! This is the Stories & Snuggles set, coloured with Copic markers.
Thursday, May 14, 2026
Stories & Snuggles
Wednesday, November 5, 2025
Woodland Christmas
There is a new Art Impressions release today, with six new foundation style winter/holiday scenes. This is 6088 - Woodland Bench Scene.
I have used Copic markers to colour up my image, then spattered some of the PH Martin's white paint to give the look of falling snow.
I matted the image on some dark grey cardstock that I adhered to my base with 3D foam adhesive. The two patterned paper pieces are from the 5853 - Christmas Magic paper pack. Before adhering them, I wrapped the gingham piece with some fine silver thread.
The Merry die cut is from an old Echo Park word die set, that I stacked twice before attaching it.
Friday, September 26, 2025
Christmas Whimsy Tags
My third project with the July Betterpress Society plate, 'Christmas Whimsy Ornaments' was the perfect thing to use for Christmas tags.
I pressed the plate in Memento Tuxedo Black, and coloured up the ornaments with Copic markers that matched scrap pieces of Christmas paper in my stash (Echo Park!), then cut them out with the coordinating die.
I cut a bunch of die cut pieces out of coordinating cardstock, using the Holiday Blooms die set from Spellbinders.
I put together a few different tag designs, then added some metallic silver thread and a few rhinestones to add some sparkle. I will add some plain white tags behind these where people can write their 'to & from', and then can switch those out and reuse them a time or two.
Monday, September 8, 2025
Capybara cards!!
I took the most amazing class from The Papercrafter's Workshop this weekend... using the adorable Capybara set from Lawn Fawn.
I haven't bought the set, as I wondered how many capybara cards I would actually give out? But now I'm rethinking that idea... So I thought doing a card class would be a fun way to create with the set. Darlene at PCW designed a really fun class with some 3D & interactive elements:
We did ink smooshing to create the watery sky/river using distress inks, then glued all the elements in place. Our kit included all the die cut and stamped pieces, so I had already coloured up all the images with my Copic markers.
This large die cut is layered onto some 3D foam to give it the extra dimension. The card was intended as a horizontal card, but I switched things up a little.
Another one that I mucked with! This was to be a gift card holder, but I don't really give out a lot of gift cards, so I turned it into a simple birthday card.
And our last card used an interactive Spellbinders die, that allows you to pull up the panel on the front to reveal the message. So easy to assemble! And such a cute card. *I know there are a few kits still available at the PCW store, and the class is available on replay if you're interested.
Wednesday, July 16, 2025
New Ai People!
I have always love the Ai People that Bonnie creates for Art Impressions. They are releasing five new ladies today - all with a little attitude! I am from a golfing family, so was excited to see 6080 - in the line up!
I stamped her along with her golf bag in Memento Tuxedo Black ink on Cryogen paper, then coloured her up with Copic markers. (I just happen to own a pink & black golf bag exactly like this...) There are coordinating dies included in the set which I used to cut them out.
I created my background with three colours of cardstock, a Memory Box die that cut the golf skyline, and my Lawn Fawn hillside for the foreground. I glued the golf bag to the background, then double layered the golfer to give her some stability, and popped her up with some 3D foam adhesive. There are a bunch of sentiments in the set, so I picked "Still got it" and stamped it directly on the background with Versafine Onyx Black ink.
Friday, June 27, 2025
Rainbow Pride Card
It's Pride weekend in Toronto, and I like to get at least one or two Pride cards made each year. When I saw Andy Granick's rainbow leaf card, I knew that I had the perfect stamp to do my own version.
This is the Long Line Leaves background stamp by Kristina Werner, coloured rainbow style with Copic markers. I used two shades of each colour to add a little depth, and it actually came together fairly quickly.
Sentiment is Dashing Sentiments by Pigment Craft Co., stamped in Onyx Black Versamark ink, and layered several times. A few black gems finished it off.
Happy Pride everyone!
Monday, May 5, 2025
Wine Tasters
I had stamped this image some time ago, and coloured it up with Copic markers a few weeks ago. This is the Wine Tasters set from Art Impressions - one of their amazing Girlfriends sets.
I've actually done this stamp set with this paper pack before! I knew how well it worked, and didn't need to reinvent the wheel, so decided to do it again. I'm using the Art Angel Mini Deck from Cosmo Cricket. I pulled out colours from the papers to colour up the gals, then fussy cut them and mounted them onto my background with 3D foam adhesive.
I used strips of the different patterned papers in different widths, and cut a square of a brick toned paper to go under the image. The sentiment is from the Get Corked stamp set by My Favorite Things. A few champagne pearls finished it off.
Sunday, April 6, 2025
Inspired By... Rain
I am playing along with the Inspired By Challenge this week! I haven't done a challenge in a while, but was inspired by the photo. I knew I had this image (Tiny Townie Rachel Loves the Rain) stamped out from many years ago, so pulled it out and coloured it up with my Copics.
For some reason I decided to colour in rainbow order!? So starting with her umbrella, I worked my way down her outfit to her boots, using about 15 different markers.
I pulled out the Colour My World paper pack from Crafter's Companion for the background paper, and matted my image on some dark brown cardstock.
The sentiment is from Verve's Rain or Shine stamp set, and is popped up with foam adhesive. The card itself is 6" x 4 3/4".
Tuesday, March 25, 2025
Holiday Mansion
I pulled out a retired Art Impressions set that I had previously stamped to do a little colouring while I watched a video or two... this is the Holiday Mansion with the Garden Set add-on.
It was stamped on Cryogen cardstock which has a creamy cast to it, so I paired it up with some old Carta Bella papers from my stash, and set about colouring the pieces with my Copic markers. There are matching dies that cut out the windows, doors and small items as well.
I made my background scene with the patterned papers - I love this look! And it's a great way to use up patterned paper. It's a little larger than an A2 size, being 4 5/8" x 6".
Monday, January 27, 2025
Vintage Vixens
This is a real oldie from Art Impressions that I had stamped off many years ago, and just pulled it out to colour this week. I've had these Graphic 45 papers in my stash for ages as well, so it was a great excuse to use up a bunch of product, and I got to make a card for a special friend.
Friday, August 16, 2024
Spooky Crew
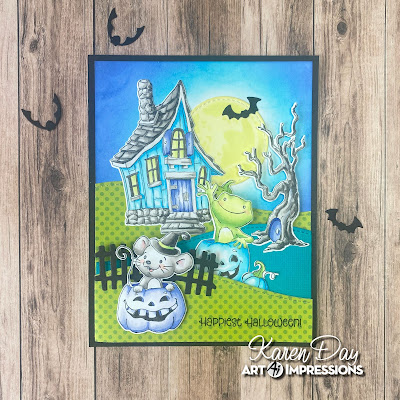
I don't give out Halloween cards, but I do love to make them! This is the new 5934 - Spooky Crew Set from Art Impressions.
I had a lot of fun colouring this set up with my Copic markers, and decided to try making a Halloween card without using any orange... there have been so many funky Halloween colour combinations being used on cards lately, that I wanted to see what I could come up with. I'm really happy with the results!
This set includes matching dies, so after colouring, I cut out all my pieces, and planned out my background. The base is just a 4 1/4 x 5 1/2" piece of black cardstock. On some white cardstock, I ink blended Mermaid Lagoon and Blueprint Sketch Distress Oxide inks, to create my night sky, leaving a white area where I attached a circle that I had coloured with my Copics to look like the moon, and sponged on a little Squeezed Lemonade ink. I made each of the hillsides into a flap, so that they open up from each side. If you remember the Ai Try-fold cards, you'll see what I was going for.
On the middle panel, I attached the tree and frog, and on the front panel I used 3D foam adhesive to attach the mouse over a black fence piece cut using 4967 - WC Fence Dies. The sentiment is included with the Spooky Crew stamp set. I also cut out a black bat from 5769 - Halloween FB Fence Set.
There's enough room on the inner panel to write a note to the recipient that would be hidden by the two flaps.