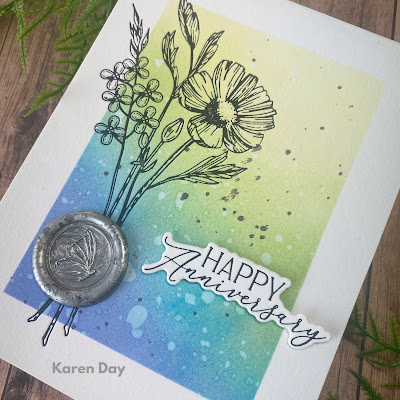
Happy Anniversary to us! 30 years. Time flies when you're having fun. Just a quick post to share the card that I made for my hubby. I used the Sealed Florals Betterpress plate, and the Say it with Everything Sentiment set. I masked off my Cotton Card panel, and used a few Distress Oxide Inks to blend my background, then spattered it with water and a little ink. I added a silver metallic wax seal and popped up the sentiment with 3D foam adhesive.
Tuesday, July 30, 2024
Monday, July 29, 2024
Poinsettia Wreath
I went a little die cut crazy with this one! Yes, it's a lot of cutting, but I really love this look, so find that it's totally worth the effort. I've pulled out the Spellbinders Poinsettia Spray die again, and this time instead of using the entire sprig, I just used the two poinsettias, gluing them together, along with the holly leaves.
Friday, July 26, 2024
Dragonfly
A very different card from me today! Both in colour and style. I haven't used either of these products in a while - both are from The Greetery. I used several Distress Oxide inks to colour the Leaves All Around stencil set, and then stencilled and die cut out the Jumbo Curiosity Dragonfly die set.
Both the gingham shape and the dragonfly are adhered down with 3D foam adhesive for a little extra dimension, and I added tiny sparkles to all of the grape clusters. All of the card edges were darkened with a little Speckled Egg ink.
Thursday, July 25, 2024
Poinsettia Spray
I'm in Christmas card mode! This is the beautiful Poinsettia Spray etched die from Spellbinders - and I am making cards that will be on display at the Papercrafter's Workshop.
I'm using a colour combo inspired by Yana Smakula, who often does a teal base, with darkened edges. So after starting with the teal cardstock, I die cut the poinsettias out of a lighter shade, then used Mermaid Lagoon ink to darken their centers.The branch was cut in a deeper teal, and I left a sliver of it showing when I glued on my holly leaves, which gives them a bit of a shadow effect. I used metallic gold cardstock for the flower centers, that are accented by the gold pearls and gold glitter embossing powder used on the sentiment. The white flower centers and sentiment strip are navy cardstock, and the edge of the base was inked with Pinkfresh Studio's Stargazer ink.
Wednesday, July 24, 2024
More Fresh Picked!
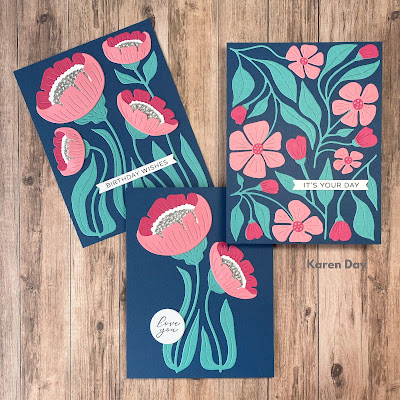
I have another colourway using two of the Fresh Picked die sets from Spellbinders.
Love this colour combo of two warm blush pink shades, with an icy blue/green on a navy base. And a little silver glitter cardstock for some sparkle.
All sentiments are Betterpress on Porcelain cotton card panels.
Thursday, July 18, 2024
Fresh Picked Anemones
I'm over the moon to have this die set in my hands! I really love the Fresh Picked collection by Spellbinders, and have two cards today - made with the Fresh Picked Anemones dies:
Both sentiments are from Pinkfresh Studio.
Sunday, July 14, 2024
All is Calm
I am on a roll making some Christmas in July cards! I don't usually do a lot in that regard, but if the opportunity presents itself to get a few Christmas cards made ahead of time - I take it.
This is the All is Calm Betterpress plate from Spellbinders - I bought it a few months ago, as it debuted last fall - and I didn't want it to disappear out of the stores... so I'd tucked it away in my craft room waiting for the chance to use it. I had a couple of these pale pink poinsettias left over after making cards with Spellbinders Poinsettia Spray die set, along with the glittery gold cardstock arch - and realized that this press plate would just fit inside the smaller sized arch.
I've used Pinkfresh Studio's Stargazer ink on Neenah Solar White Classic Crest cardstock, which doesn't give the lovely embossed feeling that the Betterpress cotton card panels do... but the image stamps quite well. I added on the poinsettias with glittery centers, and that was it!
You can find all things Betterpress & Spellbinders at the Papercrafter's Workshop!Wednesday, July 10, 2024
Craft-A-Flower: Rose
I've had this beautiful Craft-A-Flower: Rose die for a while now, and this is only the second time I've used it!
I wanted to try doing all the layers in different shades using my Gansai Tambei Watercolour set. The rose and leaves were all cut out of Canson XL Watercolour Paper, and after they dried, I spattered them with both the dark green and white (for the leaves), and the rose tone on the flower.I ink blended Picked Raspberry Distress Oxide ink onto a piece of pale yellow cardstock, concentrating the ink in the lower left corner, and fading it outwards. Then I used the Dotted Tile cover die to give it the background design. *All the dies are from Altenew.
I added a Betterpress sentiment and a few Pinkfresh jewels to finish it off.
Sunday, July 7, 2024
Ai Fairies!

Friday, July 5, 2024
Popsicle Cards
Just something quick & fun tonight. I wanted to do something summery - so pulled out some older product that I've had for ages. This is the lovely Goldenrod paper by One Canoe Two, along with the Cool Treats stamp set from Stampin' Up.


.jpg)
.jpg)
.jpg)


%20(1).jpg)
.jpg)
%20(1).jpg)

.jpg)
%20(1).jpg)
.jpg)

.jpg)
.jpg)
.jpg)
.jpg)
.jpg)
.jpg)
.jpg)

%20(1).jpg)