Showing posts with label Holiday Blooms. Show all posts

Tuesday, January 7, 2025

Gifts Christmas Card Shaker

This was my second card using the November Betterpress Society plates from Spellbinders, 'Gifts'.  They work for birthdays or Christmas, so I pressed them using Festive Berries and Lucky Clover Distress Oxide Inks on regular cardstock - and made it into a shaker card.

I used Concord & 9th cardstock and some ancient CTMH patterned paper from my stash.  The Spellbinders Essential Arches dies were used to cut the shaker, and the Holiday Blooms die cuts were added as a little embellishment.  I had a package of shaker bits from Sizzix that I used as my filler, along with some tiny glass beads.  The Foilable Sentiment is from Pink & Main.
Before running my plates through my die cut machine, I flicked water onto the inked up plates, as I wanted to see what the effect would be like with the Betterpress - and was not disappointed!  It created a kind of bokeh effect.
You can get a subscription to the Betterpress Society through the Papercrafter's Workshop.


Monday, November 18, 2024

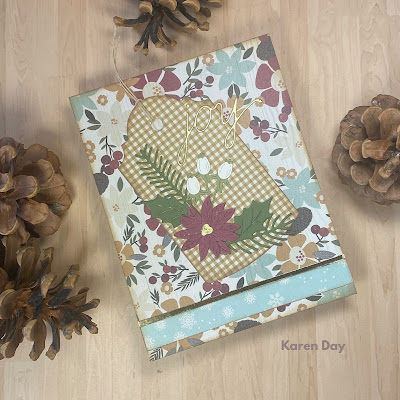
Winter Farmhouse

I've been hoarding the Winter Farmhouse papers from Simple Stories for a LONG time!  But I am slowly trying to use them up.  I had precut the tag, and had the bits and pieces from Spellbinders Holiday Blooms die set already on my craft desk... so this card was born.

The Joy is an old Memory Box die that has been in my stash forever... and the little gold strip was cut off of a panel that I'd run through my Minc machine this weekend.
This is one of the rare times that I haven't added foam tape to a card!  It'll be a good one to mail.

All supplies were bought from the Papercrafter's Workshop.


Saturday, November 16, 2024

Holiday Blooms

 I wanted to revisit my Holiday Blooms die set from Spellbinders - I have bags of precut bits, ready to go, so I decided to do a bright version today.

I started with my Nested Postage Labels & Tag dies - also Spellbinders, masked it off and did some ink blending with Broken China Distress Oxide ink.  Then I began building my spray.

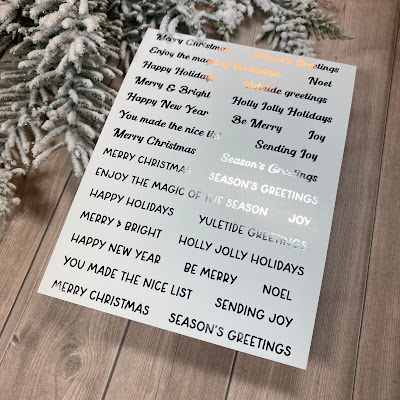
I wanted something small and sparkly for the sentiment, so I used these new-to-me Foilables from Pink & Main.  I haven't used my Minc machine in a long while, but these were so quick and easy to do... so I foiled one panel in gold, and cut apart the one sentiment (I'm set for a long time now!)

You can get the Foilables and Spellbinders products from The Papercrafter's Workshop.


Thursday, May 23, 2024

Hello

This is one of the first Betterpress plates that I owned, and pressed it on my first play day, but haven't used the impression until now!  I love the big bold sentiment, and have a bunch of ideas on how to jazz it up a little.

I pressed the plate onto a Pebble Cotton card panel using Betterpress Black ink (perfection!), and cut it out with my die from The Greetery.

I used my Spellbinders Holiday Blooms die set to cut out all of my bits and pieces, and arranged them around the sentiment, then added some Glacier Jewels from Pinkfresh Studio.  After matting it on black, I adhered it to my blue card front using 3D foam adhesive.
All supplies can be found at The Papercrafter's Workshop!


Thursday, March 28, 2024

Another Floral J

 I created a second version of my Floral J and Sentiment press plate card - exactly the same design as my previous post, just with a different colour theme.  Here is the bright version:


Background paper is Simple Stories, Colorvibe.  Frame is Stitched Scalloped Rectangle die from Pinkfresh Studio.  Stargazed ink by Pinkfresh Studio.  Pebble Cotton Card panel, Floral J and Sentiment press plate and Holiday Blooms dies all Spellbinders.

Everything can be found at the Papercrafter's Workshop!


Wednesday, March 20, 2024

Just a Note

 Today I'm using the Floral J and Sentiment press plates from Spellbinders - and one of my new obsessions is the Pebble Betterpress Cotton Card Panels.  As opposed to the White (Porcelain) or Bisque (Cream) card panels - this is just the barest hint of grey!

I started by cutting my 4 1/4 x 5 1/2" card panel in half - I was able to get two of these out of one piece!  After some careful alignment, I pressed the two plates using Pinkfresh Studio Stargazer ink - which has become another obsession of mine - the navy ink on the Pebble card panel is just perfection.  I adhered it to my Simple Stories Colorvibe Bold card base, and added a Stitched Scallop Rectangle die frame (doubled up for some extra depth!) in navy.
I pulled out my Holiday Blooms die set from Spellbinders, which is intended to be a Christmas set - but works beautifully here, to create a little floral spray across the bottom.  The sprigs are cut from some silver glitter paper, all the rest is just regular cardstock.  To finish things off, I added some silver rhinestones to the smaller flowers, as well as all the flowers that decorate the J.

All my supplies are from the Papercrafter's Workshop - they have all things Betterpress (and everything else) that you need to put your creations together.


Sunday, December 17, 2023

Merry Christmas!

 This new-to-me sentiment from Pigment Craft Co. is one I adore!  I made up a few square cards using some Fancy Pants papers that I've had for a while, and added some Pigment holly sprigs to one, and used my Spellbinder's Holiday Blooms diecuts on the other.


LinkWithin

Related Posts with Thumbnails