Showing posts with label Ai Bible Journaling. Show all posts

Thursday, August 5, 2021

How Lovely

 Time for another Watercolour Weekend with Art Impressions.
I am using three of the new Bible Journaling stamp sets in today's card!
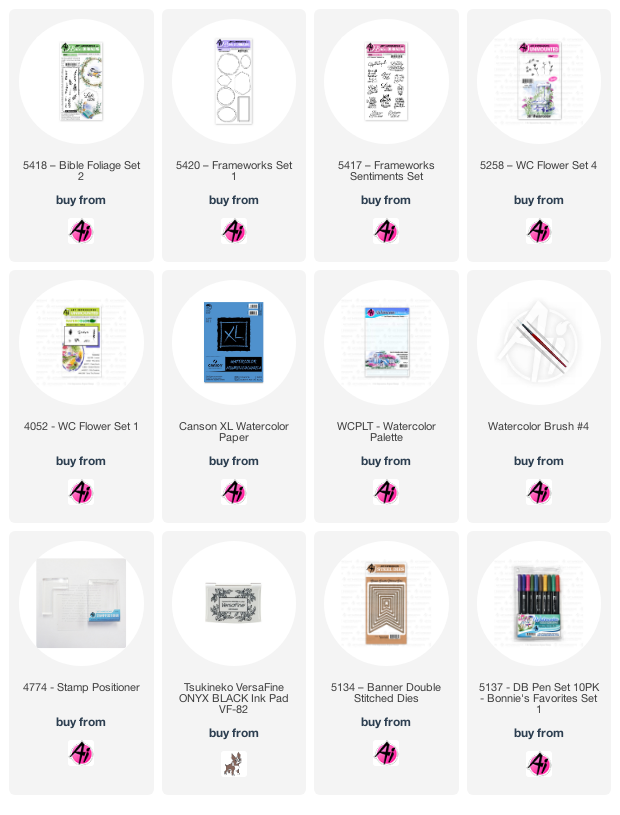
I began by planning out my image.  The clear stamps make it so easy to place the stamp sets overtop of each other, and I could easily choose which sentiment would fit inside the different frames.  I stamped everything out on scrap paper to make sure that I had my foliage placed correctly, and that my colours worked well together.  I added a light wash of #346 to the upper right and lower left areas of the image, and then coloured the larger oval from 5420 - Frameworks Set 1 in #N55 Cool Grey 7, leaving the bottom area uncoloured where my foliage would be, and stamped it on a slight angle.  With Versafine Onyx Black Ink, I stamped my sentiment from 5417 - Frameworks Sentiments Set.  With four stamps from 5418 - Bible Foliage Set 2, I stamped them in #126 Light Olive, #249 Hunter Green and #346 Sea Green, leaving an open area for the flowers.  Using Flower Set - 4052, I stamped the Leaves image in #533 Peacock Blue several times, and then used the Mini Foxglove in #565 Deep Blue to create the trailing flowers at the bottom.  To finish off, I used the trio of roses from 5258 - WC Flower Set 4 in #676 Royal Purple.
I touched everything with a damp brush, but was careful not to lose any of the definition of the images.  I used the 5134 - Banner Double Stitched Dies to cut out my shape, and glued it down to my base.  With my sewing machine, I added a wide row of zigzag stitching across the top in the same colour of thread as the roses.  A few enamel dots finished off my card.  Be sure to check out the Ai blog on Saturday to see what Dot & Tricia have to share!


Thursday, July 1, 2021

Bookmark Cards

 The Design Team is helping to launch new Bible Journaling sets on the Ai blog today!

I made a trio of cards using the 5417 - Frameworks Sentiments Set, 5419 - Bible Icons Set 1 and 5420 - Frameworks Set 1.  They started out as bookmarks, but I decided they would each look great on a card:

I started by cutting out my tags from Bristol Smooth Cardstock - the lantern card is using the Ai 5223 - Bookmark Die, the others are from my stash.  I stamped the icons first, using a no-line watercolor method for the fruit, and typical Ai style for the other two.  These are small images, so after stamping, I used my #1 paintbrush to carefully paint in all of the colours, adding layers and shades.  I masked each of the images, then stamped the frames using Tombows for the twig wreath, die ink for the rectangle, and Versamark for the oval - which I then embossed with gold powder.  I used Distress inks and blending brushes to add some soft background colour to each tag (my favourite is the rainbow!).  Usine my Misti to help with positioning, I stamped each sentiment using Versafine Onyx Black Ink.  I cut out a second tag of each style to put behind each one - allowing them to pop a bit more, added some Baker's Twine and mounted them to the cards with 3D foam adhesive.


Here's a closeup to see the embossed gold frame:


Thursday, April 1, 2021

Be Blessed

 I have an Easter slimline card to share today!  Many of the Art Impressions Bible Journaling sets work beautifully on long slim cards, so I began by pulling out 5374 - Lily Border Set, and placed it in my Misti.

I coloured the entire image in Tombow Dual Brush Marker #N65 Cool Grey 5, as I wanted a fairly soft outline of the lilies - and stamped it onto a piece of Canson XL Watercolor Paper.  With a damp brush, I pulled out the colour, mainly from the middle of each bloom, to add a bit of shading.  I avoided the outer edges, as I didn't want to blurr the shape of each flower.  I picked up #076 Green Ochre and #177 Dark Jade from my palette, and painted in the stems and leaves, concentrating the darker colour where the shadows are.  I added a watered down bit of #991 Light Ochre to parts of the petals to add a bit of warmth, and then stamped the stamens in #933 Orange inside each flower.  I went in directly with my #947 Burnt Sienna marker to darken the centers.  #533 Peacock Blue was painted as the background, with a little #565 Deep Blue in some spots, as well as on the leaves and flowers for a bit of extra shading.

For my card base, I blended 5 colours of Distress Oxide inks, from a deep red/orange fading down to white, and then I splattered it with some gold metallic paint and water.  I wrapped a piece of green cardstock with some fine gold thread, then the image was diecut with a slimline die, and adhered with 3D foam adhesive to the green mat.  The sentiment is from the Exclusive Daisy Set available at Scrapbook.com.


Thursday, September 3, 2020

Slimline Covered Bridge card

It's Watercolour Weekend time!
 Another slimline card for you - this time featuring 5129 - He Leads Me Set:
I began by diecutting my Canson XL Watercolor paper with my scalloped slimline die, and then planned out my scene on some scrap paper first!  After colouring the covered bridge in first my #565 Deep Blue Tombow Dual Brush marker, stamping it off, and then colouring overtop with #969 Chocolate - I stamped it in the upper third of my rectangle.  Using a pencil, I drew a couple of light guidelines, extending the roadway down and towards the lower right edge of the panel.  With that in place, I knew where to position my little fox from 5016 - WC Mini Critter Set - which I coloured in #947 Burnt Sienna.  With the fox masked, I used my stamp positioner to place the fence just behind him, after colouring it in #565/969.  The tree in the set was stamped on either side of the bridge in the same blue/brown combo - and my scene was set.
I used a damp brush to pull the colour out of all the images, painting #565 onto the bridge, keeping shadowed areas darkest, and used it for the river running underneath.  Tones of #969 and #992 Sand were painted on the trees and fenceposts, keeping them streaky to suggest woodgrain.  Both browns were used to paint in the roadway as well.  A wash of #126 Light Olive was painted as the grass, and used to stamp the tiny foliage from 5073 - Bible Foliage as the tree leaves.  I also used #177 Dark Jade and #249 Hunter Green to add more colour to the trees.  A few sprigs were stamped as bushes, in #177, and the tiny grass from the set was stamped edging the road, and the larger grass was stamped in the foreground around the fence.  With the largest stamp from 4051 - WC Foliage Set, I stamped it several times in #177 behind the fence, and added the tiny dotted flowers from 5074 - Bible Flower Set in #905 Red.  They were stamped around the grass in #993 Chome Orange to add some extra colour to my scene.
To finish off, #493 Reflex Blue was painted in the sky, and a few shadows were added with #565 Deep Blue everywhere.  The roadway provided the perfect spot for my sentiment from the Exclusive Daisy Set available from Scrapbook.com


Thursday, August 27, 2020

Quick & Simple Challenge

I am joining the Art Impressions Design Team to post a card for the "Quick & Simple Challenge" on the Ai blog this week.  I did a quick watercolour painting using 5131 - Stone Path Set from the Bible Journaling collection:
I wanted to create a beach scene to finish out the dog days of summer, and this painted up very quickly.  I used the long grasses from 5007 - WC Foliage Set 3, stamped in several different greens/yellows, and added a bit of shading around the stones & dunes.  The sentiment is from the Exclusive Daisy Set available at Scrapbook.com.  I stitched my scene onto a warm brown cardstock mat with my sewing machine, and adhered it to the base with some 3D foam adhesive.  Check out the challenge over on the blog - there are always fabulous prizes to be won!

Thursday, August 13, 2020

Slimline Hobbit Door card

Hello Ai Watercolor fans! 
Slimline style cards have been all the rage recently, and I've been thinking how perfect all of the Art Impressions Bible Journaling stamp sets are for this long and skinny shape!
I started by diecutting my Bristol Smooth cardstock using this lacy, slimline die, and then began planning my card. The image from 5015 - WC Hobbit Door Set was coloured with my Tombow Dual Brush Marker #565 Deep Blue, with #969 Chocolate overtop, and then stamped about 1/3 of the way down my panel. Using my Stamp Positioner, I used the stepping stone image from 5131 - Stone Path Set, also coloured in #565/969, and stamped it to create a long winding path up to the door. The small mailbox from the Hobbit Door Set was given the same treatment. With a damp #4 paintbrush, I pulled out the grey/brown colour from the images, concentrating the colour in the shadowy areas of the stones and doorway. After scribbling #126 Light Olive onto my palette, I painted the light green as a wash of colour to suggest the grass and a hillside over the door. Using the small grass from 5073 - Bible Foliage Set, coloured with #158 Dark Olive, I stamped the grass repeatedly in and around the stones, around the door, and across the top to define the hill. Some extra greenery was added around the door, and I concentrated the darker green here to frame the doorway. #565 was used to paint in the door, layering it near the top where the shadows are, and also on the mailbox.
I repeated the blue shade by stamping the tiny dotted flowers in 5074 - Bible Flower Set along the path and beside the door. One of the longer stems from the Floral set was coloured with #158 as the foliage, and the blooms in #636 Imperial Purple - sporadically stamped along the stone path. #856 Chinese Red was added to the door hardware, and as the flag on the mailbox. The sky was painted in with #493 Reflex Blue. After softening everything with my damp brush, I added touches of #565 to add greater shadows to the stones. The sentiment is from 5136 - WC Sentiment Set 2. I adhered my panel to my blue base with 3D foam adhesive to finish it off.

Thursday, April 16, 2020

Ink Blending for Watercolor Weekend

 Hello Ai fans!  I have another card to share for this week's Watercolor Weekend on the Art Impressions blog, using 5270 - Columns Set, with minimal stamping, but lots of ink blending:
I wanted to use the lamp post image, and create a night scene, so pulled out my Distress Oxide inks, and blending brushes.  I put some tiny pencil markers on my cardstock indicating where the post would be, so that I knew where the yellow glow would be centered, and set to work blending.  Starting with Wild Honey, then Picked Raspberry and finally Blueprint Sketch.  I used some Faded Jeans around the edges of my panel, and masked off the bottom section to use it to create the ground.

Using my Versafine Onyx Black ink, I stamped the lamp post, and positioned my sentiment from 5066 - Light to my Path Set beside it.  I used my N25 Lamp Black and N55 Cool Grey 7 Tombow Dual Brush markers directly onto my cardstock, adding in the shadows on the lamp post.  After die cutting the panel, I adhered it to my black card base with 3D adhesive tape.
Be sure to check out the Ai blog on Saturday, to see what Dot & Tricia have to share!


Thursday, April 2, 2020

Ai Bible Journaling Release - Week 2

Hello Ai fans!  The Art Impressions Watercolor Design Team are helping to launch the remaining Ai Bible Journaling stamp sets.  Today's project changed as I painted.  I am using the 5272 Blossom Border Set, and had intended to paint it down one side of my rectangle, and then do a large sentiment quote beside it - but somehow, I thought a cottage would work, and ended up painting an entire scene!
 I cut the largest 5063 Double Stitched Rectangle die from Canson XL Watercolor paper, and then set up my Blossom Border in my Misti.  This made it easy for me to colour each section of my image - so I started with my Tombow Dual Brush Marker in #533 Peacock on all of the buds and flowers.  After stamping I could easily see areas I'd missed, or wanted darker, and stamped them a second time.  Next I used #249 Hunter Green to colour the leaves in the same method.  Using my damp #1 paintbrush (the smallest brush was the best choice for such small areas), I pulled out the colour from all the sections.  I scribbled some #126 Light Olive onto my palette, and added it to the leaves to brighten them up a little, and darkened the flowers with a little #565 Deep Blue.  I pulled out the colours to paint a soft halo around the floral border - and this is when my scene idea started to stick in my mind!
 I coloured the cottage from 4958 - WC Cottages Set in #565, stamped it onto my Stamp Positioner, and then reinked it with #969 Chocolate - stamping it with the help of my positioner.  After softening the lines and pulling out the colour, I used #565 on the large mountains from 5198 - WC Mountain Set, again with my positioner.  Using colours on my palette mixed together, I painted in the suggestion of far-off hills, and used #177 Dark Jade to paint the lawn around the cottage.  I used the small rocks from 5128 - As The Deer Set with #N65 Cool Grey 5 to define the edge of the stream, and used the small grass from 5073 - Bible Foliage Set and #177 adding grass to my scene.  Picking up #565 off of my palette, I painted the door, added shadows to the cottage, and the suggestion of the stream.  A little #969 was used on the roof, and to create a dirt path.
I mounted it to my kraft card base after matting with a soft blue, and added the sentiment from 5136 - WC Sentiment Set 2.

Thursday, March 26, 2020

New Art Impressions Bible Journaling Stamps!

We are launching new Art Impressions Bible Journaling stamps today!  I had fun making three projects, showing the new 5270 Columns Set:
I started by die cutting the largest of the new Bookmark Dies out of Canson XL Watercolor Paper.  Using Tombow Dual Brush Marker #N55 Cool Grey 7, I coloured the urn from the set, and stamped it in the lower left corner, and again on scrap paper.  I cut out the scrap image, and masked the urn.  Using my Stamp Positioner, I coloured only the bottom 1/4 of the large column image in #N55, and stamped it slightly higher and to the right of the urn.  Next I coloured only the top half of the column, and because these are clear stamps, I was able to match it up to the other half of my image, creating a much smaller column.  I stamped a second urn on top.  After more masking, I stamped the full column image behind the others, also in #N55.  With a damp #1 paintbrush, I pulled out the colour from the lines, keeping it where the shadows would fall.
Using the two trailing greenery images from 5126 - WC Foliage Set 4, I stamped them with #177 Dark Jade, having them trail out from either side of the urns.  I used the rose image from 5258 - Flower Set 4 and stamped it several times in #493 Reflex Blue, and touched everything with my damp paintbrush to bring out the colours.  I added several of the feathery greenery image in #126 Light Olive to my pots.  I added a pale wash of #493 to the background.  The Bookmark Dies include several small images, so I diecut a feather and cross, and added them to my bookmark along with some Baker's Twine.
My second bookmark and card are painted in the same method, with the same supplies. *More details on my blog!

LinkWithin

Related Posts with Thumbnails