Wednesday, October 8, 2025

Sweet Moments

The August Betterpress Society plate from Spellbinders, is called 'Sweet Moments'.  I pressed the image on regular cardstock using the new 49th & Market Fossil ink.

Given that I used a muted grey for the main press, I came up with a muted colour palette to use with the coordinating stencils.  I chose four colours of Distress Oxide ink, using a little extra shading to colour them in.

I pressed a second set of the image, and fussy cut around the three largest flowers after colouring them with the stencils as well.  They were adhered to the main image using 3D foam adhesive.

There are 3 sentiments included in the set, so I picked one, pressed it in the Fossil ink, and cut it out with the coordinating die.  It was also attached with foam adhesive.  A few champagne pearls finished it off.

You can get a Betterpress Society subscription from The Papercrafter's Workshop.


Sunday, October 5, 2025

Christmas Cars and Classic Truck Foundations

 I am up on the Art Impressions blog today for the Watercolour Weekend post.

I have one fall and one Christmas card to share with you today,  let's start with my favourite season:

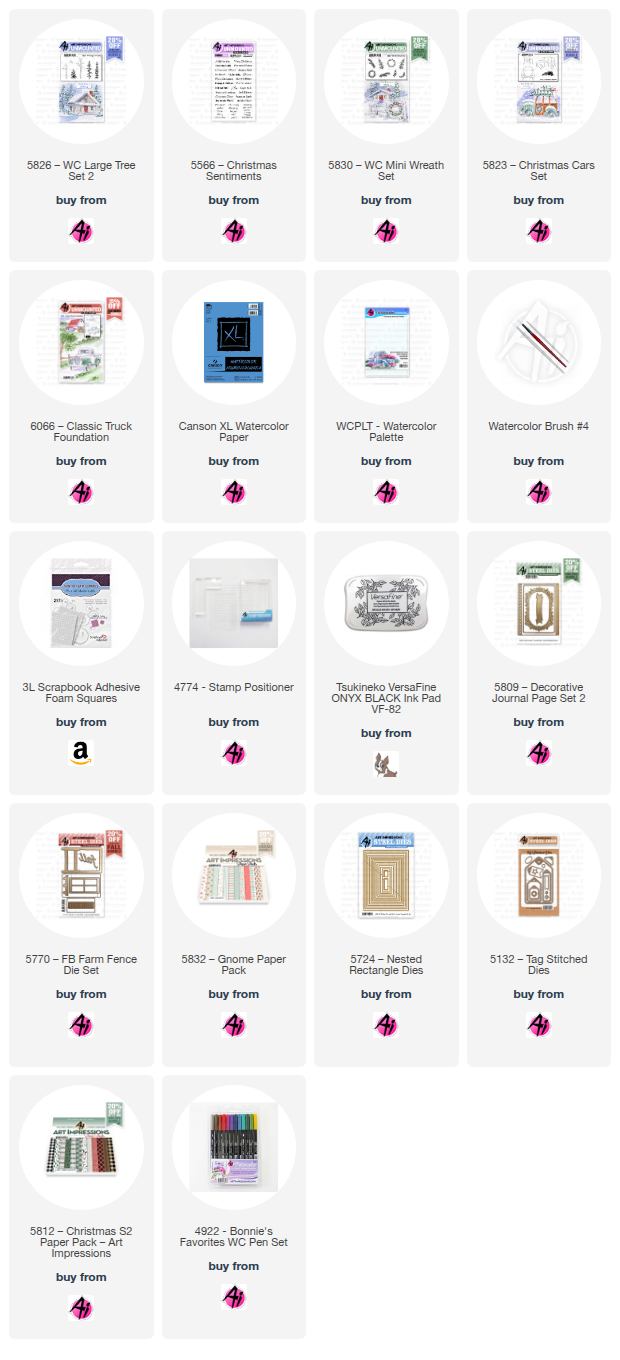
This is the 6066 - Classic Truck Foundation set.  I went for the softer side of fall with this one.  I stamped my image with #N45 onto some Canson XL Watercolour paper, and pulled out the colour with a damp brush.  I used a wash of #177 with touches of #993 to paint in the hillsides, and shades of #992/969 for the dirt road, tree and fence.  The truck was painted with a mixture of #565/249 to create the washed out aqua shade, and all the trim was done in layers of #N45. The interior of the truck was painted with #565 to give a shadowed look.


I wanted a white barn, so only painted light shades of #N45 on the shadowy sides of the barn, and a darker layer of grey on the roof.  I used a pencil to add in the vertical barn boards.  The doors were painted in #837, and #565 was used to shade in the windows and under the eaves.  A wash of #493 was painted in the sky, leaving negative white space to suggest clouds, and I added in some areas of #N45 to add some shading to them.  I drew in the trees along the hillside directly with my #177 and 933 markers, and even though I used a tiny foliage stamp for the tree in the foreground, I wasn't happy with the look so used the markers directly on my paper to add in the leaves. 

The image was die cut with the stitched/rounded corner die from the 5809 - Decorative Journal Page 2 set which fits the Foundations perfectly!  I added a blue mat underneath it, and mounted it onto this pretty plaid from the 5832 Gnome Paper Pack.  I wanted to accent the barn door colour, so used the Fall word die from 5770 - Farm FB Fence Set, cut out three times from some warm pink cardstock, and layered on top of each other to create a nice thick word.  I offset my panel slightly to the right of my card.

My second card is the start of my painted holiday cards!  

I used the sweet little truck from 5823 - Christmas Cars set, and stamped it in #N45 onto some Canson XL Watercolour paper.  After pulling out the colour, I painted the truck with several layers of #837 to build up the darker areas, leaving the rounded parts of the truck much lighter.  I masked off the back of the truck, and used my stamp positioner to stamp the tree from 5826 - WC Large Tree Set 2 in #249.  After touching it with a damp brush, I stamped it a second time to add some of the detail back in.  I wanted a wreath on the front of the truck, and the little half wreath from 5830 - WC Mini Wreath Set worked perfectly!  I used #249 and my stamp positioner to get it in the right spot.

I used #565 to paint in a wintry sky wash, and also added the 'suggestion' of a person in the truck, and added a shadow under it.  I used white paint and a #1 brush to dab on some snow on my scene.  I used my red Twintone marker to draw a bow on the wreath.

My image is small!  So I made a busier background using the 5812 - Christmas S2 Paper Pack.  I used the 5724 - Nested Rectangle Dies to cut it out, and matted it with black cardstock.  I cut the 5132 - Tag Stitched Die from the woodgrain paper, and adhered it down to my background.  The sentiment is from 5566 - Christmas Sentiments Set stamped in Versafine Onyx Black ink.

Monday, September 29, 2025

Welcome Faye!

I made a new baby card for my son to give to a friend.  I love her name, and decided to put it on the card, just using some fun papers that I've had in my stash for a while from Cosmo Cricket.

Both alphabets are from Art Impressions.  I cut the name out twice and stacked them for a bit of extra dimension.

I added a few aqua gems for a little sparkle, just because.

Saturday, September 27, 2025

Candy Cane Season

I wanted this die from the first time I saw it!  I held out for a *short* while, but was excited to add it to my craft supplies.  This is the Candy Cane Season die from Hero Arts.

I found these cute papers from the cute Say Cheese Classic Mouse Christmas papers from Simple Stories, then added a few bits from the Holiday Blooms die set from Spellbinders.  The bow is from All Tied Up dies by The Greetery.


I got six of these done for my stash!  Let the Christmas card making begin in earnest.


Friday, September 26, 2025

Christmas Whimsy Tags

My third project with the July Betterpress Society plate, 'Christmas Whimsy Ornaments' was the perfect thing to use for Christmas tags.  


I pressed the plate in Memento Tuxedo Black, and coloured up the ornaments with Copic markers that matched scrap pieces of Christmas paper in my stash (Echo Park!), then cut them out with the coordinating die.


I cut a bunch of die cut pieces out of coordinating cardstock, using the Holiday Blooms die set from Spellbinders.

I put together a few different tag designs, then added some metallic silver thread and a few rhinestones to add some sparkle.  I will add some plain white tags behind these where people can write their 'to & from', and then can switch those out and reuse them a time or two.

Tuesday, September 23, 2025

Metallic Christmas Whimsy Ornaments

My second project with the July Betterpress Society plate, Christmas Whimsy Ornaments is using metallic inks and cardstock - lots of shimmer!

I swiped three colours of Lisa Horton Crafts metallic inks across the plate on the diagonal, before pressing it onto regular white cardstock.  I picked one of the sentiments and pressed it in Betterpress Black ink.

I cut the coordinating die out of Emerald Foil Cardstock from Prism Studio, and adhered it to my base with 3D foam adhesive.


I cut a small poinsettia from matte gold cardstock and layered it under the sentiment. 

You can get a subscription to the Betterpress Society from The Papercrafter's Workshop.


Monday, September 22, 2025

Metallic inks & Christmas Whimsy

I made two more cards with the July Betterpress Society plate, 'Christmas Whimsy' this week.  I had pressed these awhile ago, and wanted to get them completed.

I used Lisa Horton's metallic inks for both of them  The first is using Silver Shine on white cardstock.  I picked a paper from my stash that had a silver glitter line in the plaid, and used the coordinating die on it to cut out the ornament shapes.  I used the Holiday Blooms die set from Spellbinders to cut out a poinsettia and some glittery holly leaves to attach with the sentiment.

This one was using the pretty Mojito ink, so I kept the colours soft & pretty.  I cut the smaller poinsettias out of Tonic Studios glimmery pink cardstock, and added some white foliage with my sentiment.

You can get a Betterpress Society subscription from The Papercrafter's Workshop.


LinkWithin

Related Posts with Thumbnails