Showing posts with label Tuesday Threads with Karen. Show all posts

Tuesday, October 31, 2017

Halloween edition of Tuesday Threads with Karen

Happy Halloween, Ai Sewing fans!!
I have the October edition of Tuesday Threads with Karen Day to share with you today.
Two of the fabrics in the Shop Hop collection designed by Ai owner/illustrator Bonnie Krebs, are a subtly patterned bright orange, and a wonderful limey green... and given that my posting day was the 31st, I decided to make a little Halloween decor:
I've created a little pumpkin placemat/hotmat/potholder.  I'm choosing for it to be part of my Halloween decor, and if I had a bowl of candy to put out, it would be the perfect thing to set it on.  I started out by sketching out my design to make a pattern:
I drew my pumpkin shape, and added a 1/4" border as a seam allowance, and drew on my stitching lines.  I cut out two of these in the orange fabric, then cut apart the stem and cut one of it from the green fabric.  I used Therm O Web's HeatnBond Lite fusible adhesive and ironed it onto the top orange piece.  I cut a piece of Therm O Web's High Loft Fusible Fleece about the same size as the pumpkin, and fused it onto one of them.  I stitched the pumpkin pieces together with a 1/4" seam, clipped the edges and turned it inside out.  After slip stitching the bottom edge shut, I ironed the pumpkin so that the edges were flat and nicely rounded.
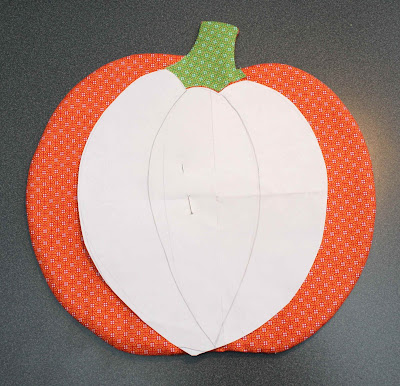
 I cut apart my pattern along the stitching lines, and pinned it onto my pumpkin to use as a stitching guide using orange thread to indicate the grooves on the pumpkin.
   I switched to green thread and zigzagged around the stem - this finished off the raw bottom edges nicely.  And there you have it!  Do you remember the mug rug that I made last month?  Just imagine how cute a small version of my pumpkin would be as a mug rug!!  Lots of possibilities...
 Have a happy & safe Halloween - and happy sewing :o)


Tuesday, September 26, 2017

Tuesday Threads with Karen

 It's the September edition of Tuesday Threads with Karen, over on the Art Impressions blog
When I first learned that Art Impressions had come out with the Shop Hop fabric line available through Henry Glass Co., I immediately thought of the Ai Girlfriends stamp set called Quilt Set (Sku #4544) and wanted to make something to coordinate with the quilt in the image.  I decided to make a quilted style project that I've put into an embroidery hoop that can be hung on the wall of my craft room.  I made a matching mug rug as well:
I'm using an 8" diameter hoop, so I decided that I would do a pattern of squares that are all 3 1/4" after being sewn together.  I cut all of my pieces, including squares of Therm-O-Web's medium weight fusible Tricot interfacing that I fused on the back of each square of fabric.  I traced a heart shape onto the pink print, and adhered it to the cream square using Therm-O-Web's Heat n Bond Lite iron-on adhesive.
Using some embroidery floss, I did a blanket stitch around the raw edge of the heart to finish it off:
After a good pressing, I placed my finished square into the embroidery hoop.  On the backside, I hand sewed a running stitch around the excess fabric that was not in the hoop, and cinched it up so that the fabric is hidden underneath.  Now it's ready to hang on a nail on the wall!
While I was cutting my fabrics, I decided that a mugrug was in order, so I cut out a front and back square ( 3 3/4") along with a square of Therm-O-Web's Hi-loft Fusible Fleece to sandwich in between:
I cut another pink fabric heart, adhered it in the same way, and stitched around the edges again with embroidery floss.  I also used my sewing machine to stitch through all the layers, about 1/4" around the heart.  I sewed on the bias tape, carefully mitering the corners (I'm getting better at this!) and handsewed it down on the backside:
And finally, I coloured up the gals in the quilt.  I used all the vibrant shades that are in the spool fabric to colour the image with Copic markers, and kept the rest of the card bright & fun.


Happy sewing, everyone!


Tuesday, August 22, 2017

Quilted Sunglasses Case

 It's the August edition of Tuesday Threads with Karen.
 I've sewn a few larger projects for my sewing room over the last few months, so I decided that it was time for something quick & easy... and more of a personal item.  Here is my attempt of a quilted sunglasses case that I found on Pinterest (here):
 I started out by drawing out my pattern on a piece of paper, metric & standard measurements as shown:
 I cut the pattern out of two different fabrics from the Shop Hop collection designed by Ai owner/illustrator, Bonnie Krebs - available through Henry Glass Co.  I also cut a slightly larger piece of Therm O Web's Heat 'n Bond High Loft Fusible Fleece that I sandwiched between the two fabrics.
 I taught myself how to do a "stippling" pattern of free motion quilting with my sewing machine - which is an irregular squiggle pattern that you create by twisting and turning the piece to be quilted, as you sew.  I didn't have the right presser foot for my sewing machine, so I did the best that I could with my regular foot.  Here's a better shot so that you get the idea:
 I sewed a contrasting colour of bias tape around the perimeter of my shape, adding in a loop that will hold the case together when it's finished.  I flipped it over and hand sewed the bias tape on the underside for a clean finish.
 I folded the sides together as shown below, and stitched across them, about 2cm (3/4") in from each point.  When you turn the case right side out, these form little square bottom corners that give the case some shape, and allow it to sit upright.
I slip stitched the side edges of the bias tape together, and anchored the opening with a whip stitch to secure the ends - this will keep the glasses snug inside the case:

 And finally, I sewed a button on that will keep the case shut when the loop of bias tape is secured over it:
 This was so fun to sew!  It makes a great afternoon project, and would be a great gift for a Girlfriend.
Happy Sewing everyone!


Tuesday, July 25, 2017

Sewing Machine Cover

Hello Ai Sewing fans!
 It's the July edition of Tuesday Threads... and if you remember last month, I made a quilted mat for my sewing machine to sit on.  This month I have the matching sewing machine cover to share with you!
 I'm using the wonderful Shop Hop fabrics designed by Art Impressions owner/illustrator, Bonnie Krebs - available through Henry Glass Company.
 I designed my cover partially based on a few ideas that I found on Pinterest, but I also wanted it to coordinate with the sewing machine mat, and the needle case I'd made a few months ago.  I really love the sewing notion print that I used for the front and back - so I wanted it to be the main focus.  To make it easy to assemble, I designed it with two identical side panels that I sewed up the sides, pivoted and sewed them along the top.  Two small rectangular pieces formed the top opening for the handle.  I fused the backside of all the pieces with a lightweight, fusible tricot interfacing from Therm O Web.
I used my Cricut to cut a heart template that I traced onto the pink floral print, and then I traced it onto Therm O Web's Heat n Bond Lite - a fusible adhesive that I fused onto the back of the heart, peeled off the backing, and then fused it onto the side panel.
 I  made a double pocket on the side panel in a contrasting fabric that can hold a few extra notions to keep my sewing table tidy.  I centered the heart just above the pocket.

 I used some pink embroidery floss to hand sew a blanket stitch around the outside of the heart to finish off the raw edges.
 Here you can see the top of the cover.  Each of the side panels ended with about a 5" gap at the very top.  I added the two side pieces underneath them, leaving a one inch opening for a sewing machine handle to pop through making it easy to carry the machine with the cover on.  I finished up by sewing some blue 1/4" bias binding around the bottom edge.
 Since I created the pattern myself, there was a bit of trial & error with this project!  After assembling it, it quickly became apparent that the interfacing that I'd fused onto all the pieces was not providing enough body to have the cover stand on it's own, or to retain it's shape.  So I took the whole project apart, and Therm O Web came to my rescue!  I used their High Loft Fusible Fleece on the front and back panels, and diagonally quilted them with 2" squares like I did for my sewing mat.  I fused pieces of medium weight non-woven interfacing onto the two side panels, right over top of the tricot I used initially.  The difference was night and day, and I am SO much happier with the end result.  Happy sewing, everyone!


Tuesday, June 27, 2017

Tuesday Threads With Karen

 
I've been busy in my sewing room again... this time I've made a sewing machine mat.  I've used the Shop Hop fabrics designed by Art Impressions creator Bonnie Krebs, that are available through Henry Glass Co.
Crafting can be a messy business!  So anything that can help me stay tidy & organized is a plus - and if it makes my craft room prettier?  Even better!
 I had seen ideas like this on Pinterest, so I decided to design my own, and really wanted it to feature the fabulous "sewing notion" pattern that comes in the collection:
The finished mat is 19" square, large enough for my machine to sit on it comfortably, and the front portion that hangs down is 7" deep.  The pink print is the backing, so after sewing the front pieces together, I cut two separate pieces of Therm O Web's High Loft Fusible Fleece (love this stuff!).  *This was key to getting the mat to fold cleanly along the seam when it sits on my sewing desk, allowing the mat to bend easily, and I quilted "in the ditch" of the seam which also helped.
After fusing the fleece to my fabrics (this is such a plus, as the fleece doesn't move around at all while you quilt)... I used my high-tech quilting method to diagonally quilt the entire piece, forming 2" squares.
A few months ago (January?) I did a post about fabric boxes... I used the exact same method to make a thread/scrap catcher to attach to the mat.  It's pretty small - only about 5" high, and I fused the inside with Therm O Web's Fusible Tricot Medium Weight Interfacing to give it some body.  I sewed it onto the left front of the mat, and added a triple pocket onto the left side, that will hold sewing notions.
I finished the edge off with some contrasting bias tape, and set up my new sewing mat!!
I'll be back next month with a matching project!


LinkWithin

Related Posts with Thumbnails